
1. Class hour traffic of enterprises
1.1 Overview
- Enterprise class time traffic: the time spent watching video class traffic.
- Explanation of class fees: In order to provide users with a better video experience, the training assistant uses a third-party (Tencent Cloud) video service, so traffic fees need to be paid for video on demand. The cost of this part of the traffic fee needs to be borne by the user (the cost of the video storage space is subsidized by the training assistant and does not need to be paid by the user).
- 540P video, each person uses about 7M per minute, 720P video uses about 13M per minute, and 1080P video uses about 18M per person per minute.
- For all customers of Fenxiang Sales (including free and paying customers), the training assistant will give 100 hours of video lessons, and the excess part will be paid for at 0.5 yuan/hour.
1.2 View and purchase of course traffic
Check the class data usage and the main process description of online purchase:
The application administrator can check the [Enterprise Lesson Hours] and purchase online lessons in [Settings].

【Buy Lessons Online】
Support multiple payment methods: enterprise wallet balance (only available to enterprise wallet administrator users), WeChat, Alipay, and enterprise online banking.
illustrate:
1) The payment limit is subject to the limit of each payment method and bank card.
2) Support 9 online banking payment, Industrial and Commercial Bank of China, China Construction Bank, Agricultural Bank of China, China Merchants Bank, Bank of China, Shanghai Pudong Development Bank, Bank of Communications, Industrial Bank, China Everbright Bank.
Step 1: Select the number of lessons to purchase and enter the settlement
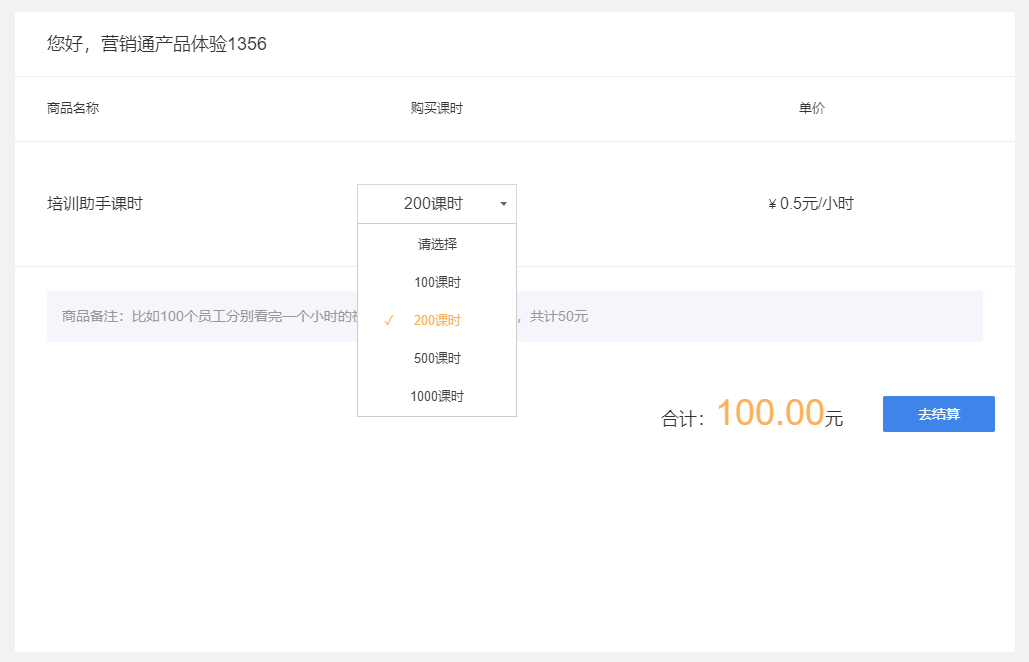
Step 2: Choose the payment method and proceed with the payment operation

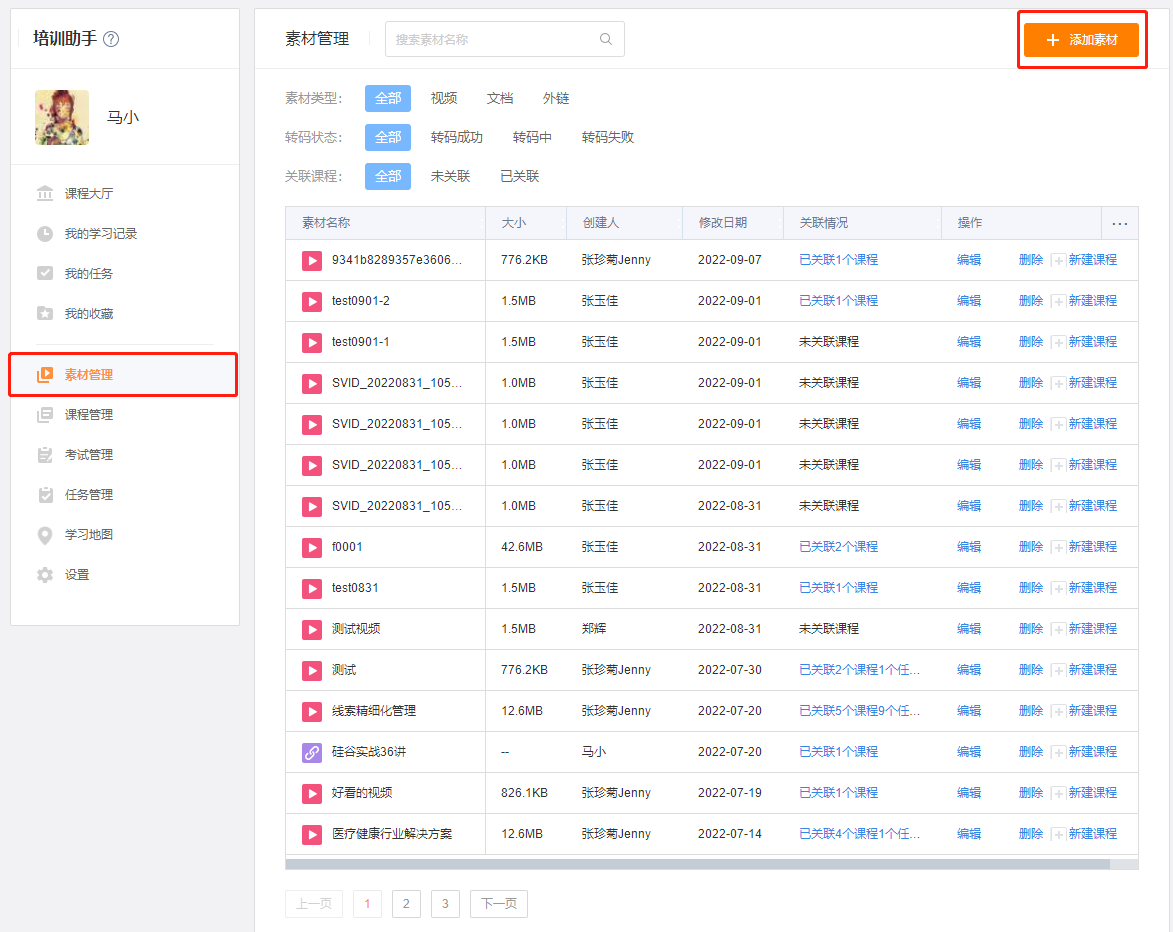
2. Material management
2.1 Overview
Material, that is, the learning content included when creating a course, for example: a video, a document or an external link web page.
Enterprises not only have courses produced by training supervisors and lecturers, but also need to accumulate and share the knowledge and experience of employees, and advocate and encourage employees to do courses (UGC, user-generated content), that is, "everyone is a training lecturer". Therefore, the training assistant provides an easy-to-use course material upload function. Students can submit recorded learning videos, document courses, or external link webpages to the course administrator, and the course administrator will create and publish the course after approval. (Currently, learners cannot create direct courses)
Description:
In order to make the video play smoothly on different network bandwidths and various devices, the material needs to be transcoded after submission (about a few minutes to several hours, the specific time depends on the size of the material), and you will be notified after the transcoding is completed.
The supported video formats are as follows:
- Microsoft formats: WMV, WM, ASF, ASX;
- REAL format: RM, RMVB, RA, RAM;
- MPEG format: MPG, MPEG, MPE, VOB, DAT;
- Other formats: MOV, 3GP, MP4, MP4V, M4V, MKV, AVI, FLV, F4V
Please pay attention to enter the legal website address starting with http(s):// for external link webpage materials
2.2 Operating instructions
Application administrators/course administrators can [edit], [delete] and [create new courses], and view materials [associated courses/tasks].
【Detailed steps】:
Step 1: Enter the [Material Management] page from the left menu, and click [+Add Material] in the upper right corner
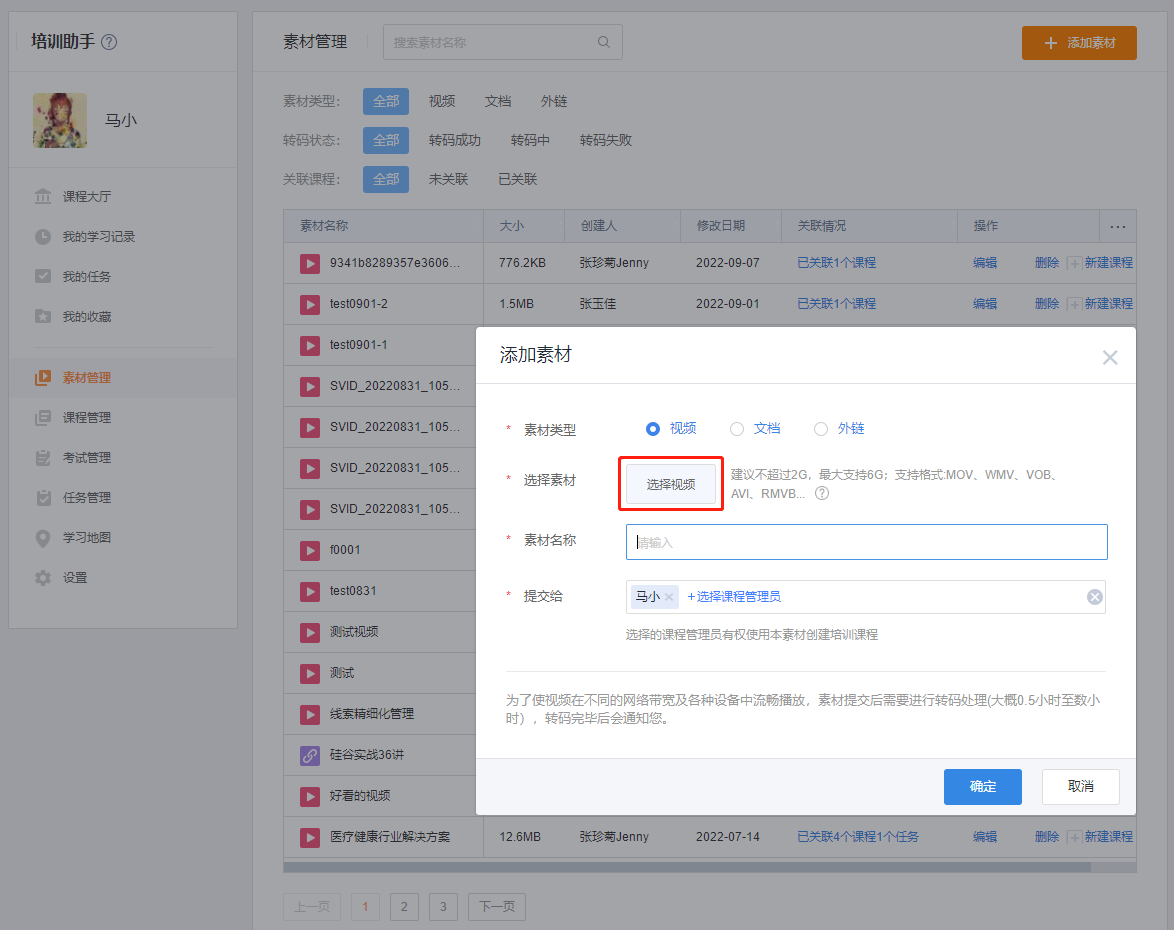
Step 2: Select the material type (video, document, external link), select the material, fill in the material name, choose to submit to an administrator, and finally click OK
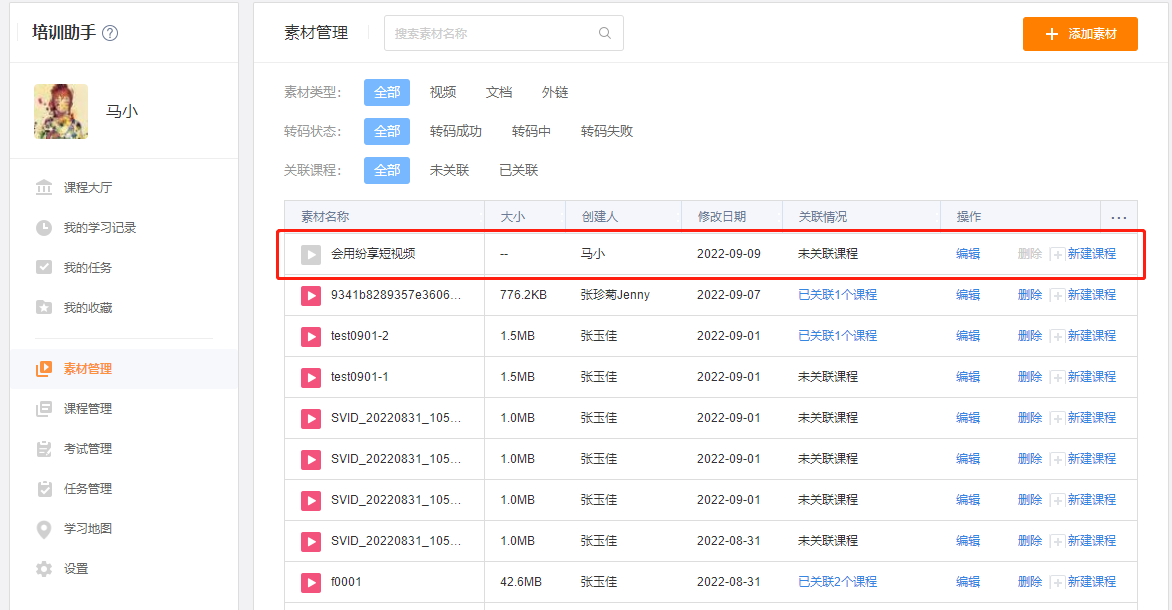
Step 3: After the submission is successful, a newly added material will be added to the material list. (After the material is submitted, it needs to be transcoded. It takes a few minutes to several hours. The specific time depends on the size of the material. You will be notified after the transcoding is completed.)
【illustrate】:
- Materials that have been referenced by the course are not allowed to be deleted.
- A material can be cited by multiple courses (up to 20 courses).
- The video material used in the graphic message of the service account is also managed in the material management of the training assistant.
3. Course Management
3.1 Overview
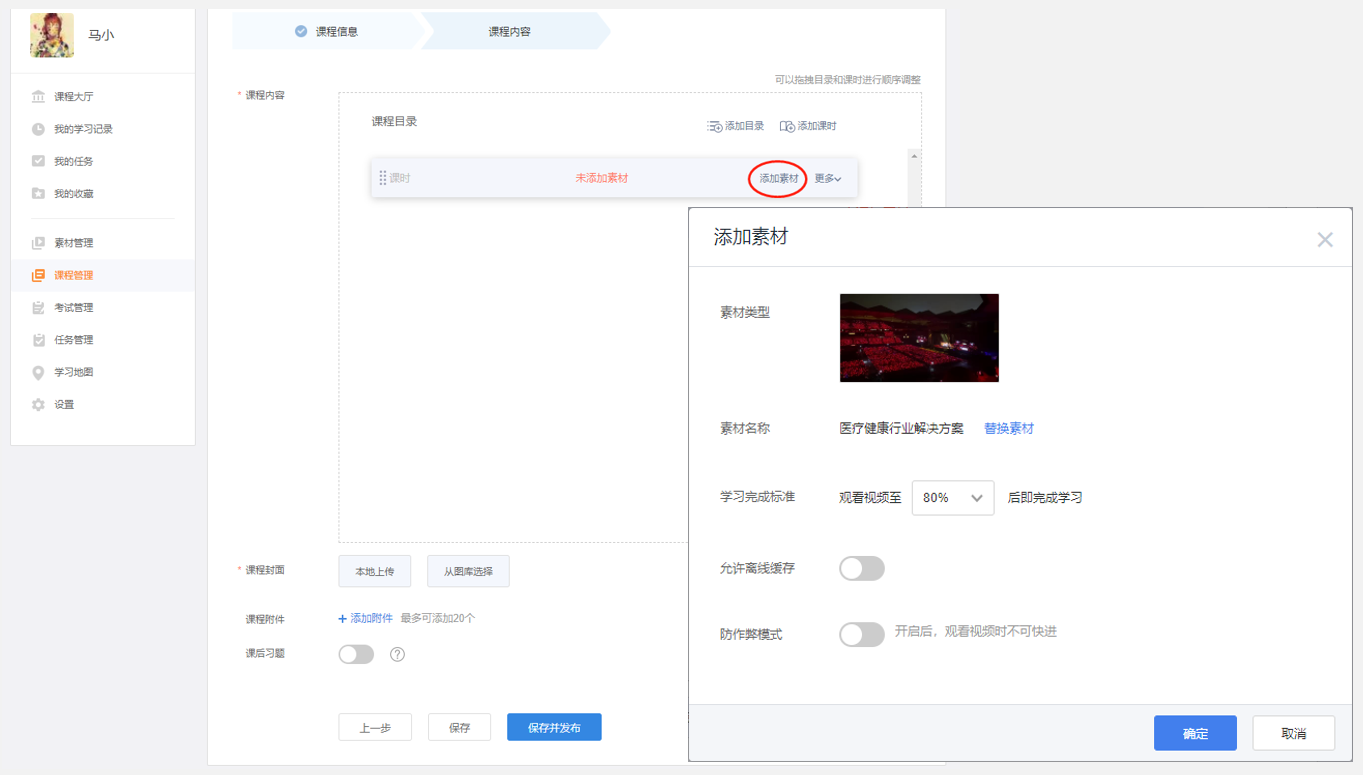
- Lesson: The smallest object of learning content in a course. Only one material can be attached in a class hour.
- Directory: Classification of class hours in a course for easy retrieval. Each level of directory has a directory name (for example: Overview of Chapter 1). Subdirectories or class hours can be listed under the directory. Multiple levels can be listed under any level of directory. class hours.
- Multi-chapter courses: Compared with the original course, only one material can be linked. A multi-chapter course can contain multiple lessons and supports classifying and organizing the lessons by category.
- Number of studies: The number of times a course is studied is equivalent to the PV of the course study, and any class of learning the course is counted as 1 time (starting to learn is counted).
- Learning progress (learning progress = the number of hours learned / the number of all hours of this course)
The maximum number of training assistant directory series can support three-level directories (excluding class hours). One or more class hours can be listed under the directory. Materials cannot be directly listed under the directory, and directories or class hours cannot be listed under the class hours.
Video class hours: Support various video types such as MOV, WMV, VOB, AVI, RMVB, etc.
Document class hours: support PPT, Word, PDF type of document courses, and support browsing and learning now.
External link course hours: external webpage course, the learning completion standard of this type of course is: open the page to learn once, and the learning is completed. Explanation: The video-on-demand traffic fee will be charged for the learning of video class hours, and the class hour traffic will be purchased by the enterprise. As long as the class hour balance is greater than zero, student users can use it. The billing rules for video-on-demand classes are as follows:
- When the video course is played by the student for the first time, the traffic fee will be charged according to the actual viewing time (charged by the third-party video-on-demand platform, 0.5 yuan/hour; there will be no charge for the student to watch the video repeatedly)
- When using the offline cache function to download video courseware for the first time, the traffic fee will be deducted once according to the duration of the courseware (the student will not be charged for repeated viewing of the video in the future)
- For all customers of FunShare (including free customers and paying customers), the training assistant will give 100 hours of video lessons, and the excess part will be charged at 0.5 yuan/hour
Courses have a visibility range setting, and student users can only see courses that have been authorized for themselves.
3.2 Operating Instructions
Application administrators and course administrators can manage courses in [Course Management]: create, edit, delete, add/edit exercises, view course learning status, answer status, details of class hours consumed, delete, modify course administrators.
illustrate:
Published courses can also be edited, and edits take effect in real time.
If a video class is added to a published course, it must be a video that has been successfully transcoded.
Operation entry:

Step 1: Fill in the basic information of the course
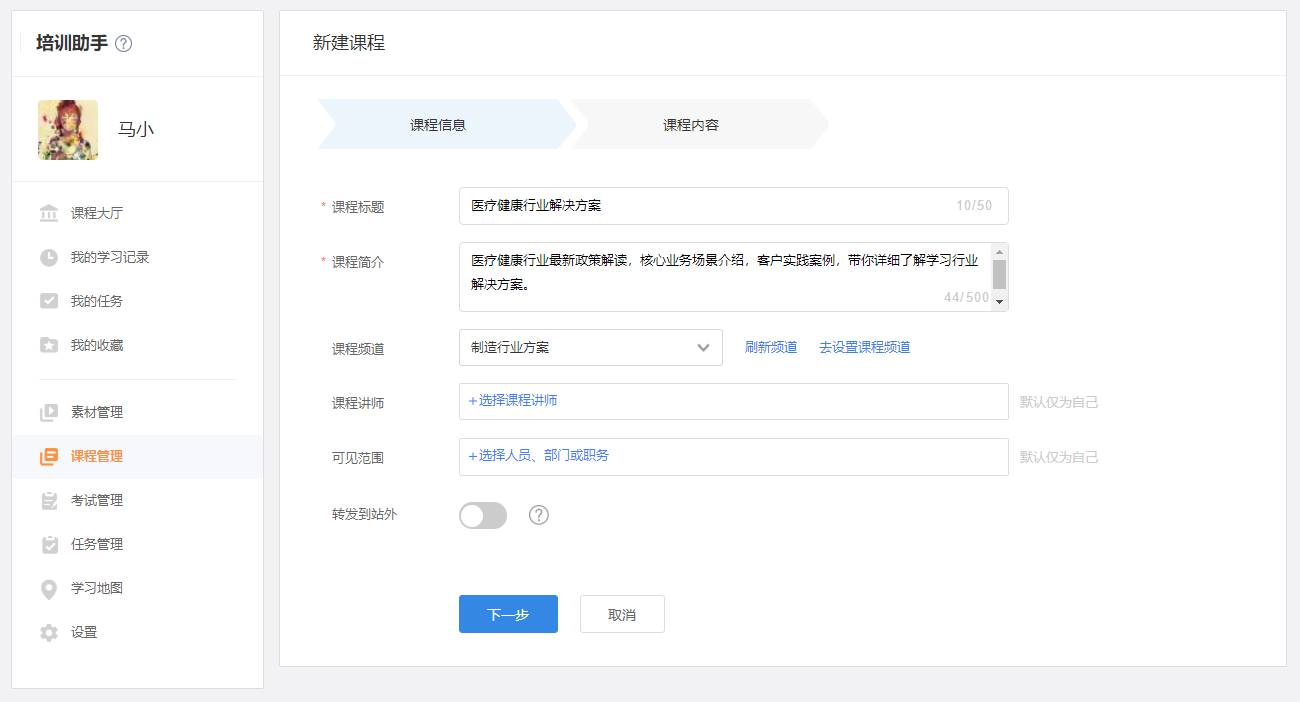
Step 2: Fill in the course content information
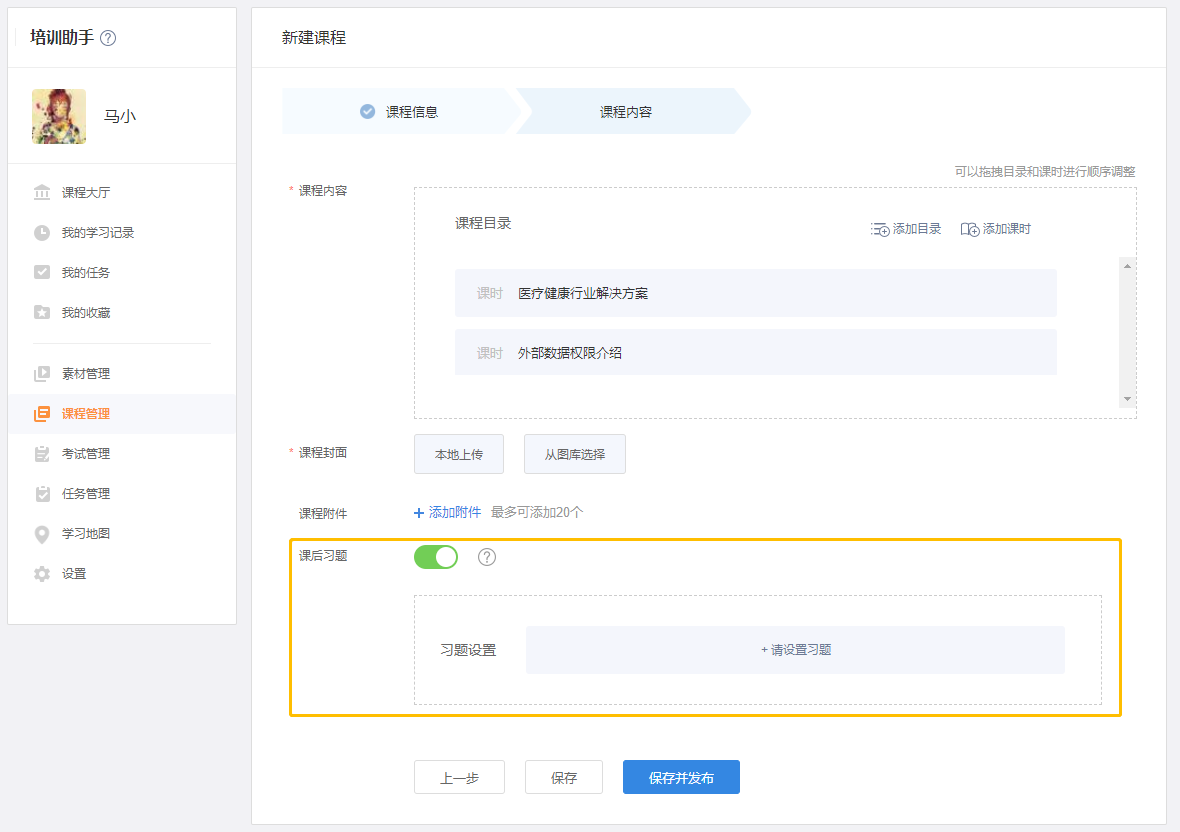
3.3 Exercises after class
After learning a course, small exercises and small tests (set in advance by the course administrator) are aimed at practicing instead of learning, reviewing and consolidating the content and knowledge points in the course.
The exercises are voluntary by the students, and the exams are not compulsory. The scores of the exercises are only for the students' reference and will not be used in the follow-up.
After-school exercises will not exist independently, but are attached to the course. After-school exercises are optional, that is, not every course has after-school exercises.
After-school exercises currently support four types of questions: single choice, multiple choice, judgment, and short answer.
The exercises are voluntary by the students, and the exams are not compulsory.
After-school exercises will not exist independently, but attached to the course.
After-school exercises can be practiced anytime and anywhere, instead of having to start and end within a specified time.
Exercises after class can be repeated many times.
The subjective questions in the after-school exercises do not involve manual scoring, and only give reference answers.
There are no anti-cheating measures for after-school exercises.
(According to the administrator's setting switch) After completing the after-school exercises, you can view the correct answers and analysis.
The scores of exercises are for reference only and not for follow-up assessment or other applications.
The main operation process and instructions for setting after-school exercises
Entrance
set exercises
4. Examination Management
4.1 Overview
Definition of formal examination: Formal examination generally requires examinees to answer examination questions in a specified way within a specified time. It is a rigorous and strict method of knowledge level and skill appraisal, and generally has specific assessment objectives. Starting from the principle of fairness, formal examinations have strict examination discipline requirements, and fraud is strictly prohibited. Generally, it is released from top to bottom and has a certain degree of compulsion. Examination results generally have relatively clear follow-up applications, such as: qualification or ability certification, performance appraisal, rating evaluation, product examination, new employee examination and other scenarios. Exams can exist as independent tasks independent of the course.
4.2 Usage Scenarios
- Enterprise internal examinations: new employee induction training examinations, product knowledge assessments, professional skill assessments, job rating assessments, corporate culture promotion effect assessments, policy and system study examinations, competitions, etc.
- Enterprise external examination (please activate the "Partner School" application of Enterprise Internet): dealer assessment: product knowledge, sales skills, sales policy examination.
4.3 Product Value
- Powerful functions to meet the online examination needs of enterprises
- Easy support for cross-regional exams
- Mobile exams, field personnel and business travelers can take the exam anytime, anywhere
- Question bank management, which facilitates the enterprise's test question classification management and historical precipitation
- Flexible paper composition, support manual paper composition and question bank selection mode, you can choose to generate different test papers or unified test papers for each candidate
- Improve the efficiency of examination organization and save the cost and labor cost of examination organization: 1) no examination room, 2) no printing and recycling of test papers, 3) efficient marking, 4) real-time progress board & score statistics
- Examination results can be archived and precipitated, and can be referenced by other businesses in the future
- Send test notifications and push test results in batches
- Anti-cheating rules to ensure the authenticity of answers
4.4 Operating instructions
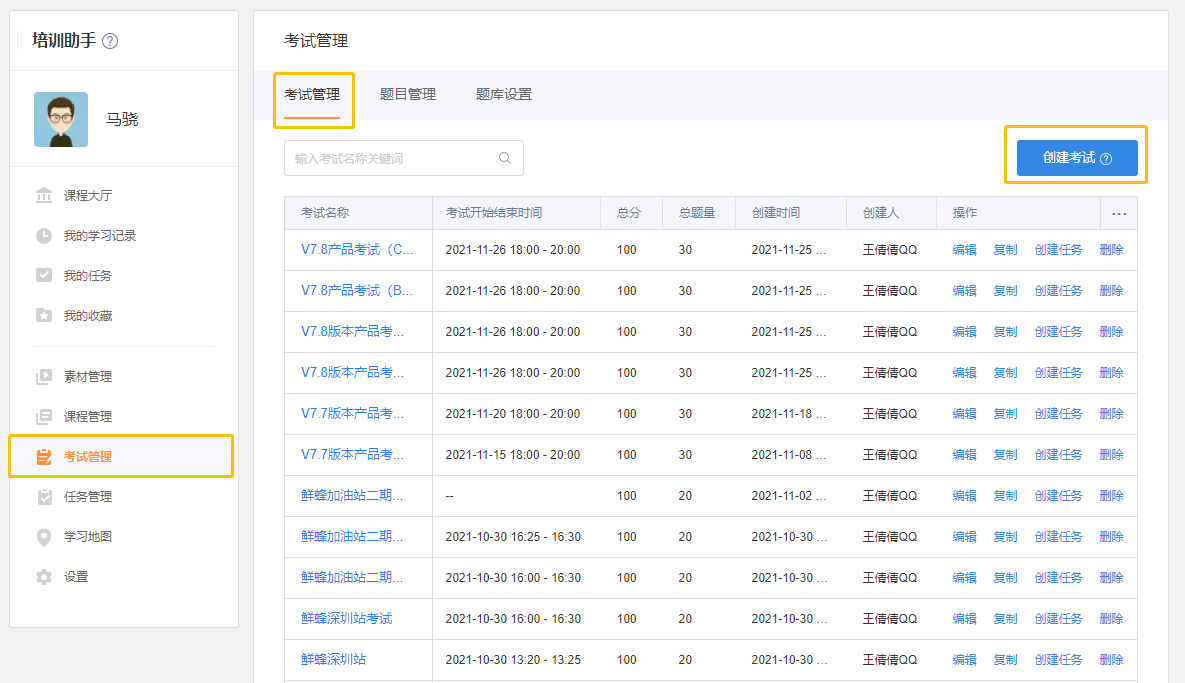
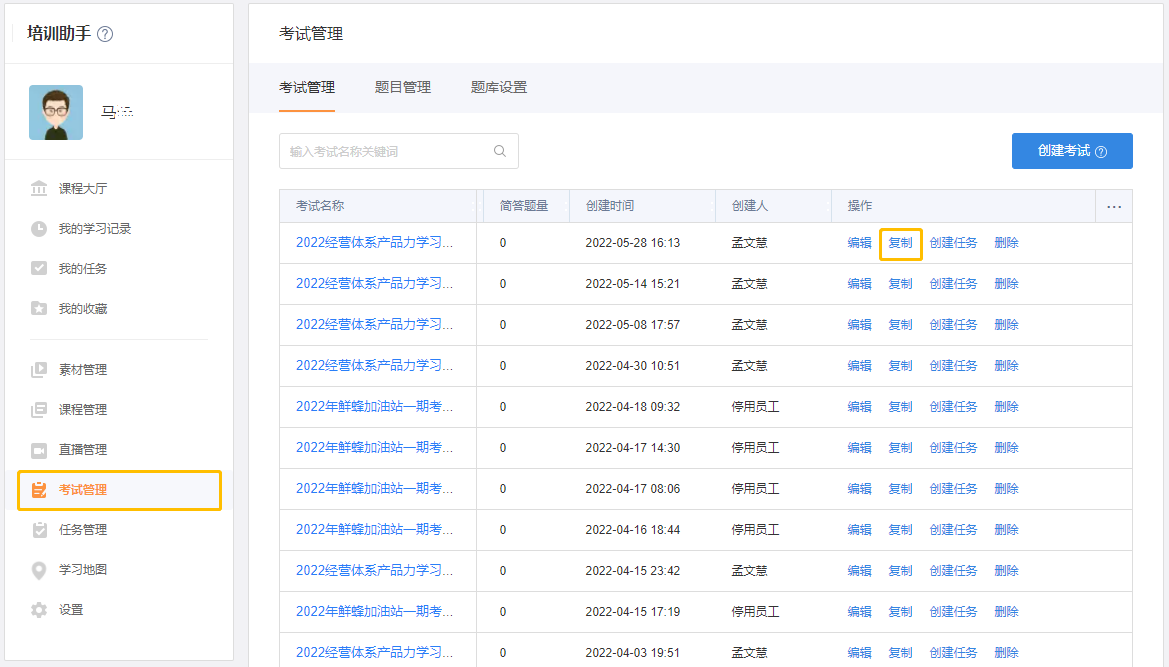
There are three major steps to using Exam Administration:
Step 1: Preliminary preparation You can customize the question bank according to your company's needs in [Question Bank Settings], and then enter the questions in [Question Management].
Step 2: Create an exam You can create exam papers and set exam rules through 【Create Exam】.
Step 3: Assign exam tasks You can select an exam in the exam management list and perform [Create Task] and [Publish Task].
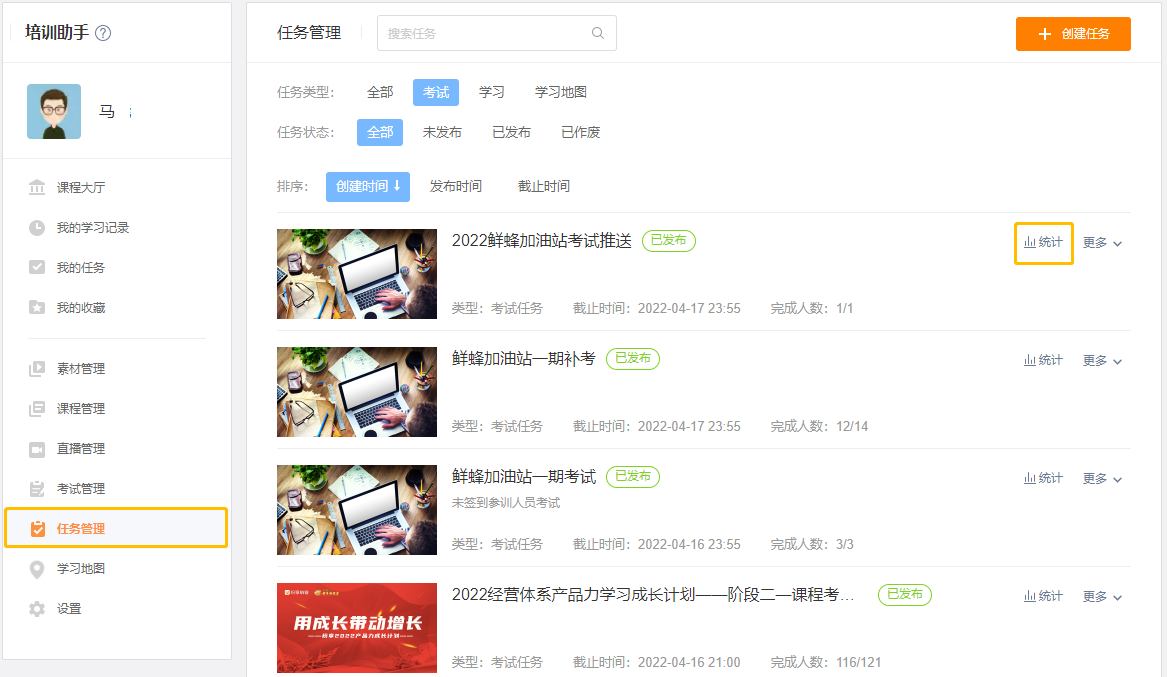
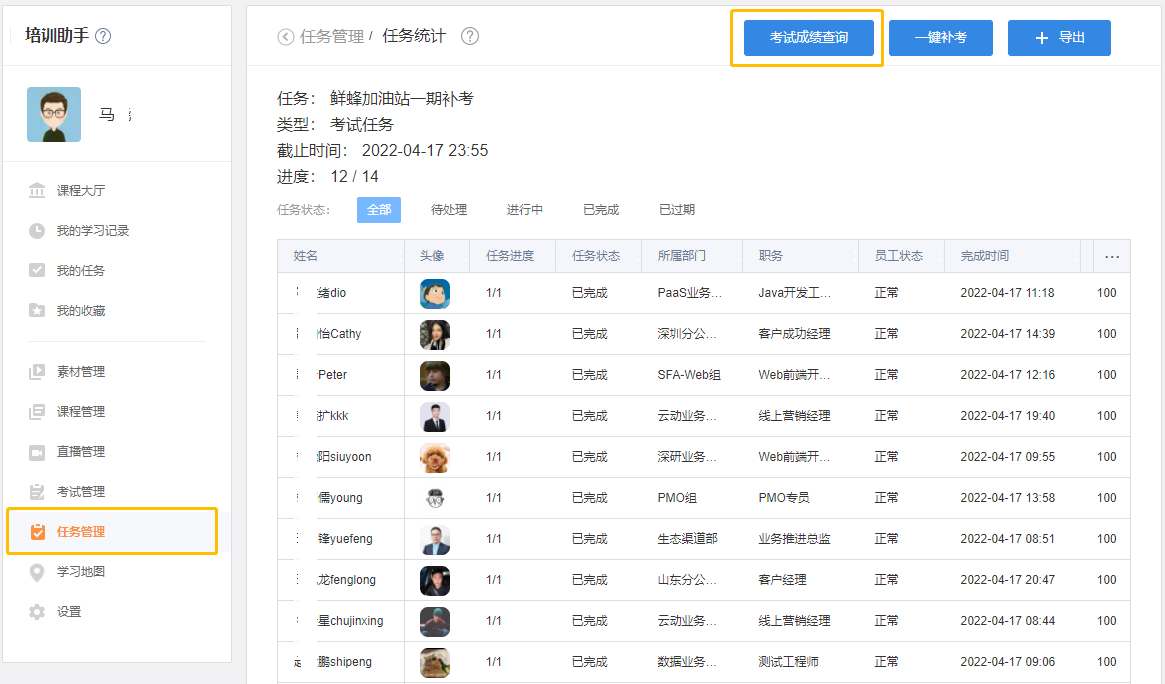
In [Task Management], you can click [Statistics] of a specific test task to view [Exam Results], check the progress and results of the test in real time, and grade subjective questions.
4.4.1 Question bank settings
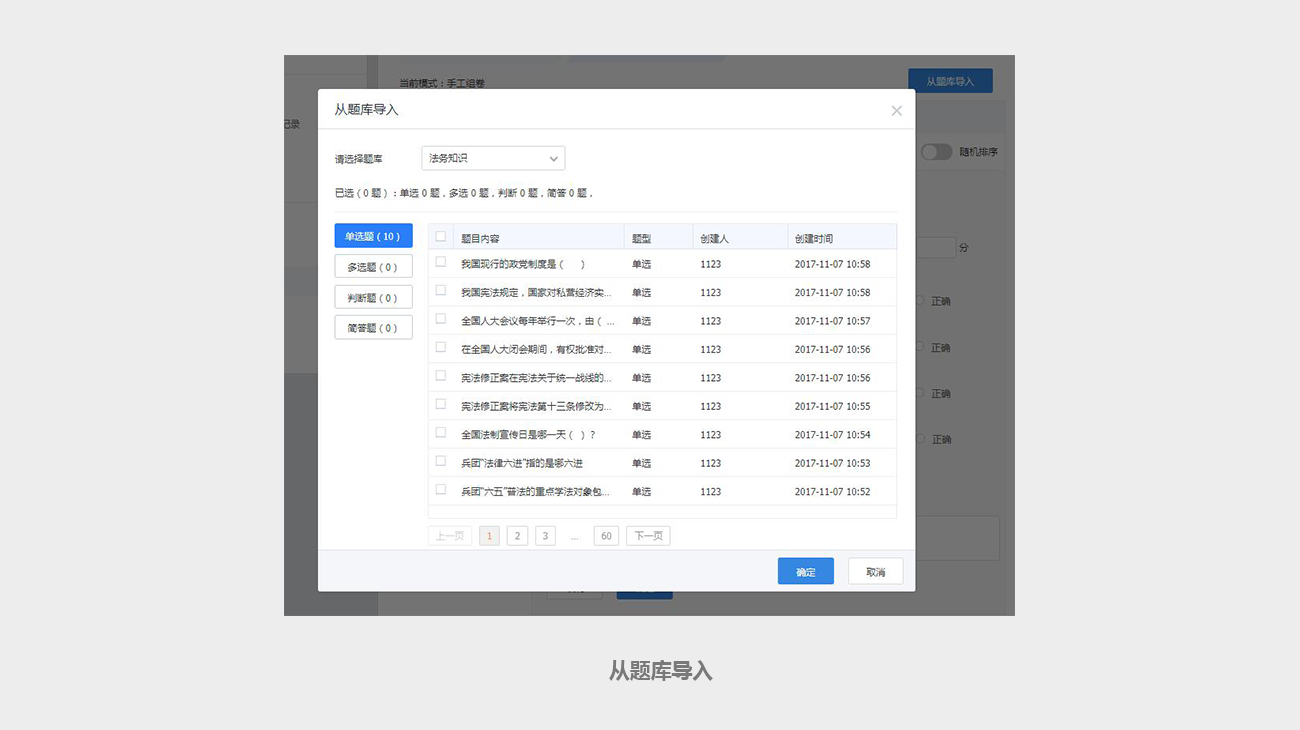
The question bank is used to classify and store questions, and when creating an exam, you can choose the [Question Extraction] mode to choose to automatically draw questions from one or more question banks. Data permissions for question banks: application administrators can see all question banks; course administrators can see the question banks created by themselves.
1) Entrance: The system presets a question bank named: (system preset) unclassified. Users can customize new question banks.
2) Create a new question bank: Duplicate names are not allowed for the question bank.

3) Delete the question bank
Question bank deletion rules
- After the question bank is deleted, all the questions in the question bank will be unclassified.
- The question bank of questions referenced by homework and/or published exam tasks in manual composition mode can be deleted.
- The question bank of unpublished question papers associated with the exam cannot be deleted.

4) Export question bank Select a question bank and click the [Export] button to export all the questions in the question bank as a word document. The following is an example export file:
4.4.2 Topic Management
A topic is the smallest unit of an exam paper. Topic management makes topics reusable. A question can be used both for exams and homework exercises. When editing the test paper, if the question is modified, the original question in the question bank will also be directly modified. When the system releases the exam task, it will copy a same question as the question used in the exam paper. In other words, once the test task is released, the modification of the original question in the question bank will not affect the test (it will affect the unreleased test task). This ensures the consistency of the test data.
Data permissions for questions: application administrators can see all questions; course administrators can see questions created by themselves or all questions in the question bank created by themselves.
1) Entrance
2) Create a topic:
- Create a new topic. You need to select the question type and specify the question bank to which the question belongs. Answer parsing is not required.
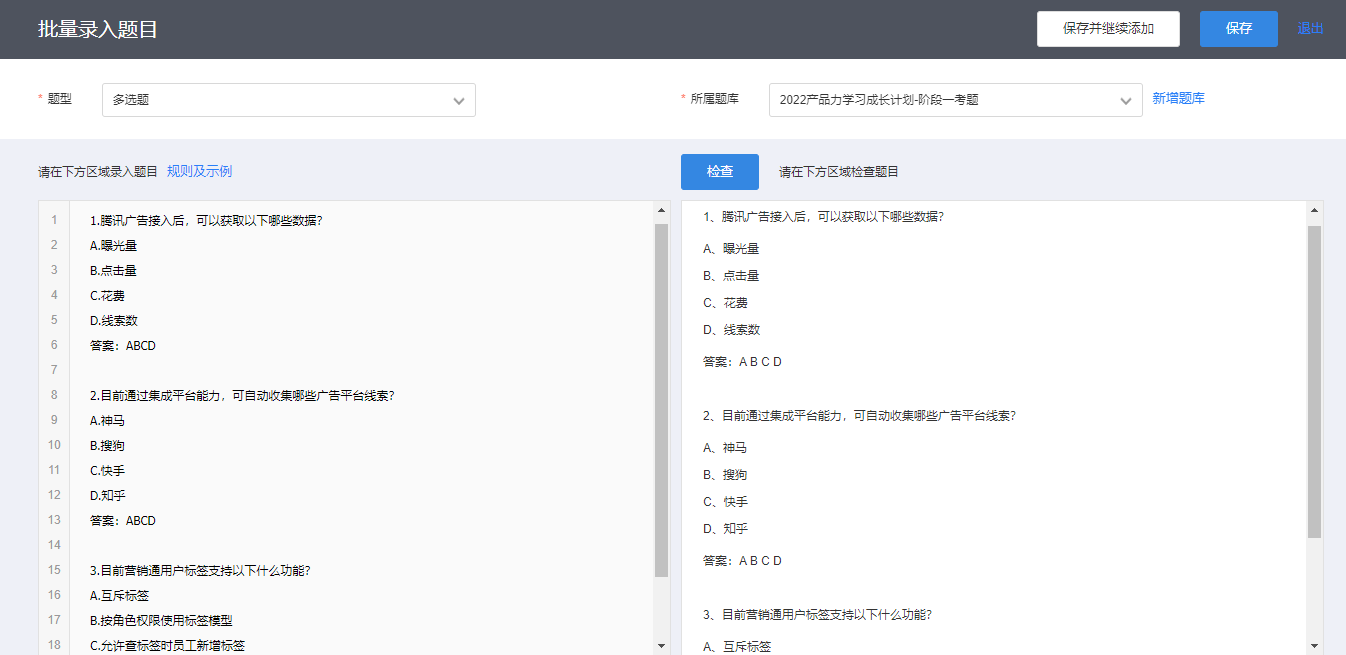
- Batch entry of topics.
3) Disable/enable topic
Topic suspension rules:
- The questions cited by the after-school exercises cannot be deactivated (because the after-school exercises and the questions correspond to the original questions, and there is no copy of the questions).
- Exam tasks that have been published, questions can be deactivated (the questions have been copied).
- Questions for unpublished exam tasks (manual composition) cannot be deactivated (because the questions cannot be copied after deactivation, and deactivated questions are not allowed to be copied).
- In unpublished exam tasks (examination test papers), the questions in the question bank can be disabled (because it has not been determined which question to draw, as long as the task is released, it is enough to verify that the questions in the question bank are enough to be drawn into test papers).
- When an unpublished task is voided, the link between the task and the test will be released.
- To cancel a task that has been released means that the association between the task and the exam will not be released, and the associated questions can be deactivated.
4) Batch edit topics
Rule explanation: Changing the question bank to which the question belongs will not affect the completed or released historical exams, but it will affect the created but unreleased exams, please be careful!
The question bank and question status of the questions can be updated in batches. If multiple questions are selected, those that meet the conditions will be updated during batch operations, and those that do not meet the conditions will not be updated.

4.4.3 Examination Management
Usage process
Step 1: Please create a topic in [Title Management]
Step 2: Create an exam in [Exam Management]
Step 3: Click [Publish Task] in [Operation] of [Exam Management] to publish your test task.
Reminder: If you need to issue subtasks that include learning subtasks and exams at the same time, you can also select the task type as [Learning Tasks] in [Task Management], select the required learning courses and a created exam, and publish them .
Rule Description
- Exams support editing, copying, task creation, and deletion.
- An exam can be associated with multiple exam tasks. When creating an exam task, please pay attention to modifying key rules such as exam name, start and end time. You can also copy a task with an exam in [Task Management], and a new exam task will be automatically copied.
- After the test task is released, please check the test results in [Statistics] of [Task Management].
- Exams associated with exam tasks cannot be deleted (test tasks need to be voided first).
- Published test tasks cannot be deleted, and can be invalidated in [More] of [Task Management].
Entrance
1) Create Exam - Manual Paper
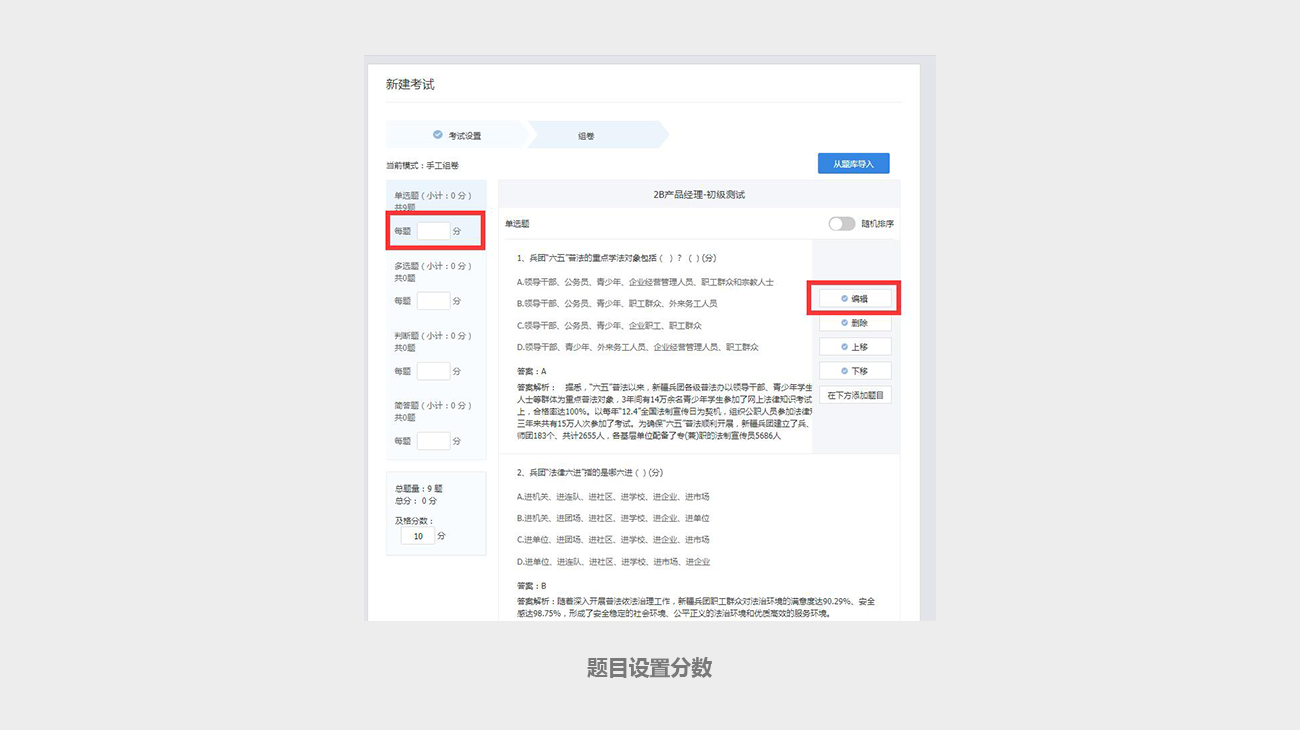
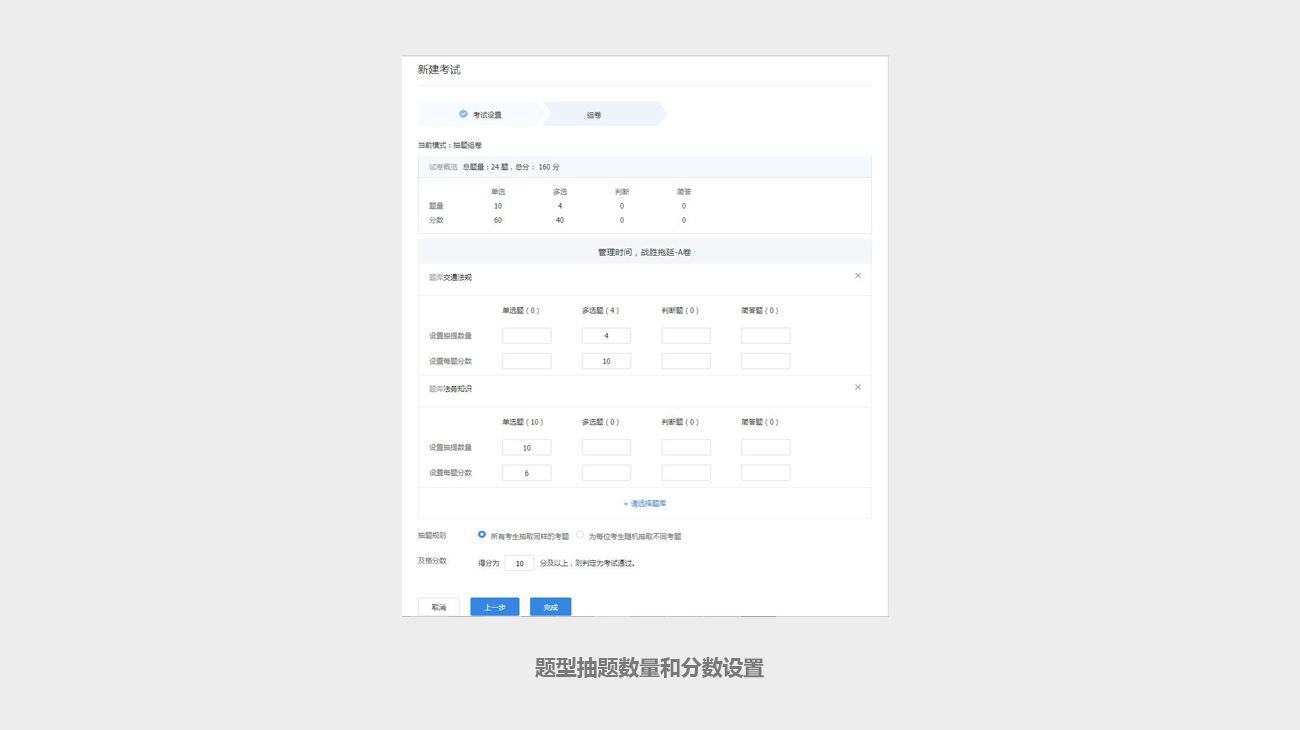
Definition: The manual composition is the test questions in the test paper manually specified by the administrator (you can create new questions, or select existing questions in batches from the question bank). The test papers produced by manual test papers have fixed questions (the order of the questions of each question can be set to be out of order).
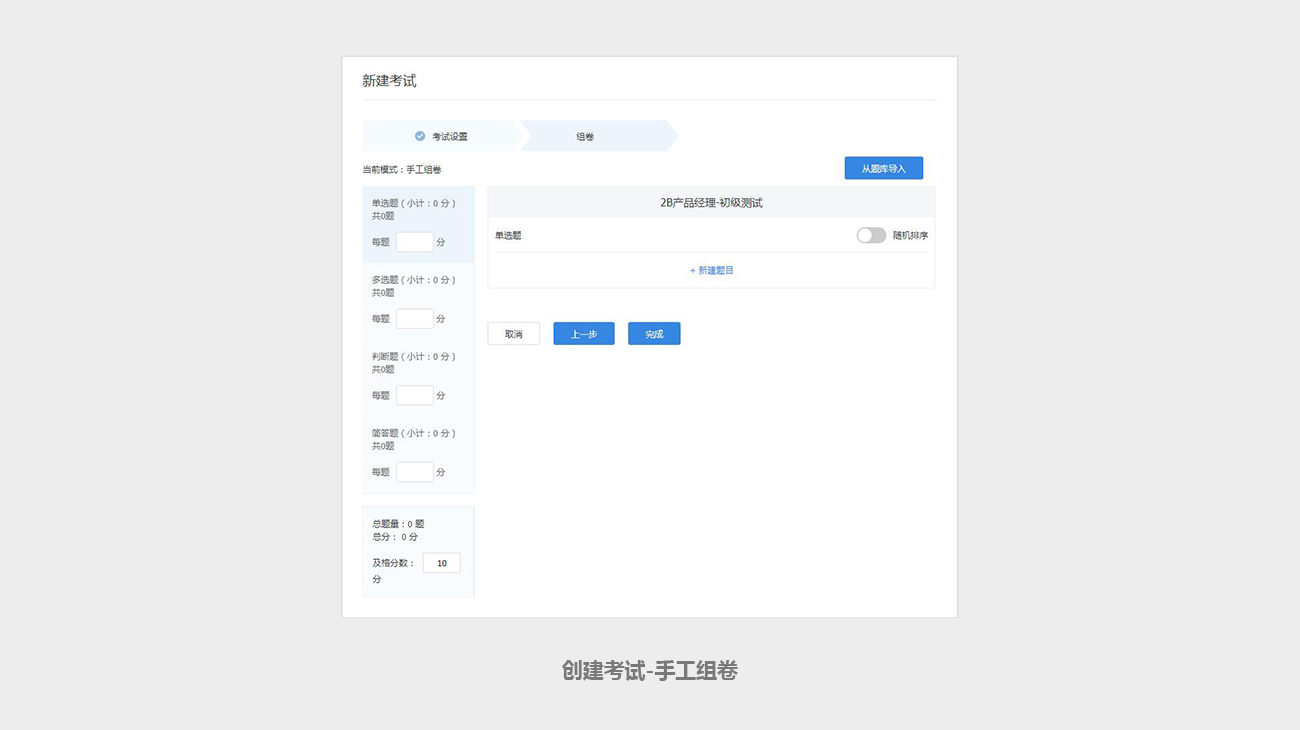
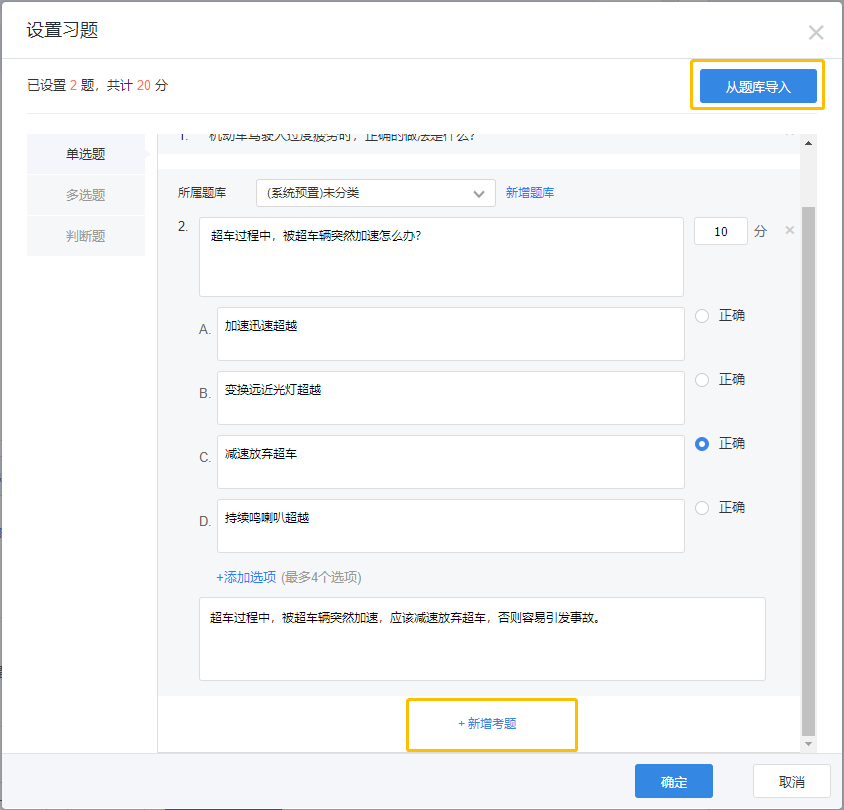
Click [New Question] to select the required question type to create a question.
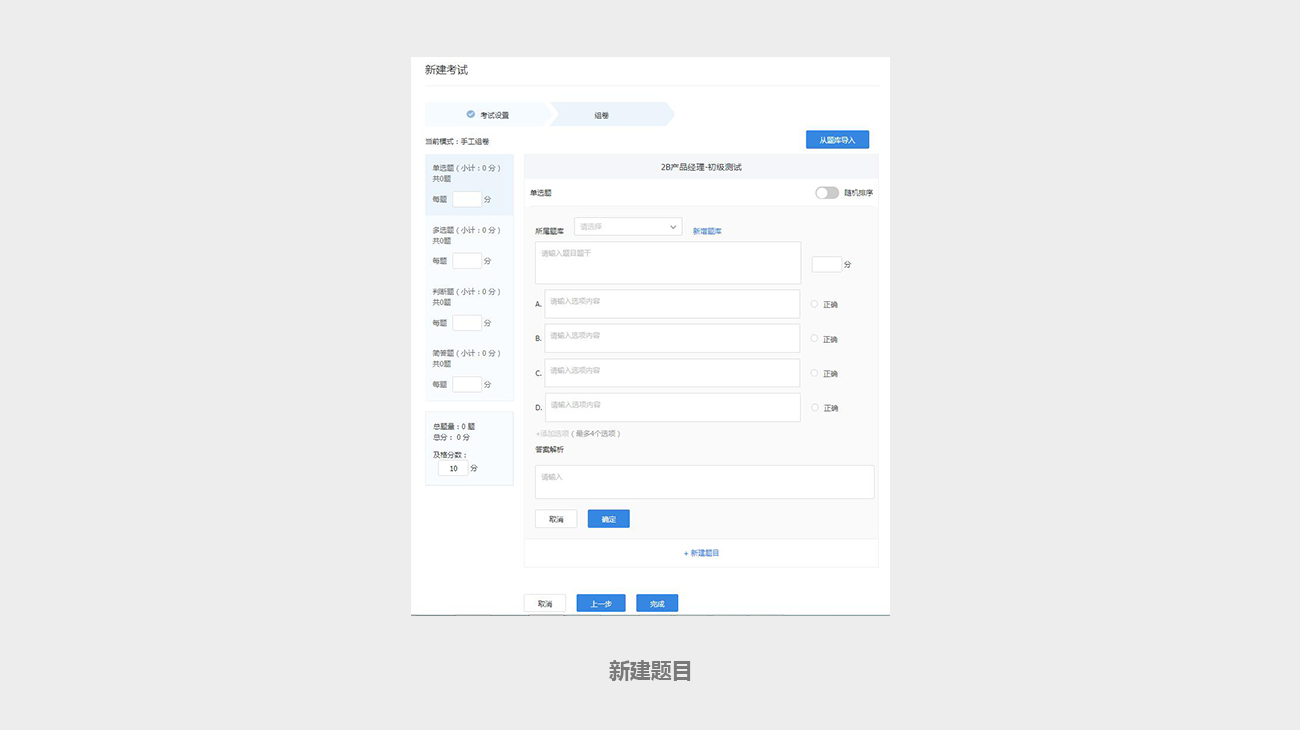
Click [Import from question bank] on the upper right, and you can select a batch of questions from the existing question bank to import in batches. Reminder: When compiling the test paper, the system will not perform the operation of judging the weight of the question. If the same question is imported multiple times, there will be multiple questions on the test paper.
There are two ways to assign points to a question:
a. Separate scores for each question
b. Set scores for all questions of a type of question in batches on the left big question panel
2) Create an exam-exam test set
Definition: It is a fully automatic way of drawing questions and forming papers, when the administrator selects one or more existing question banks, and customizes how many questions to extract from each question type in each question bank. Larger, more random.
For the test papers produced by drawing questions, the questions are randomly selected, so they are not fixed. (You can set whether all candidates use the same set of test papers or different test papers.)
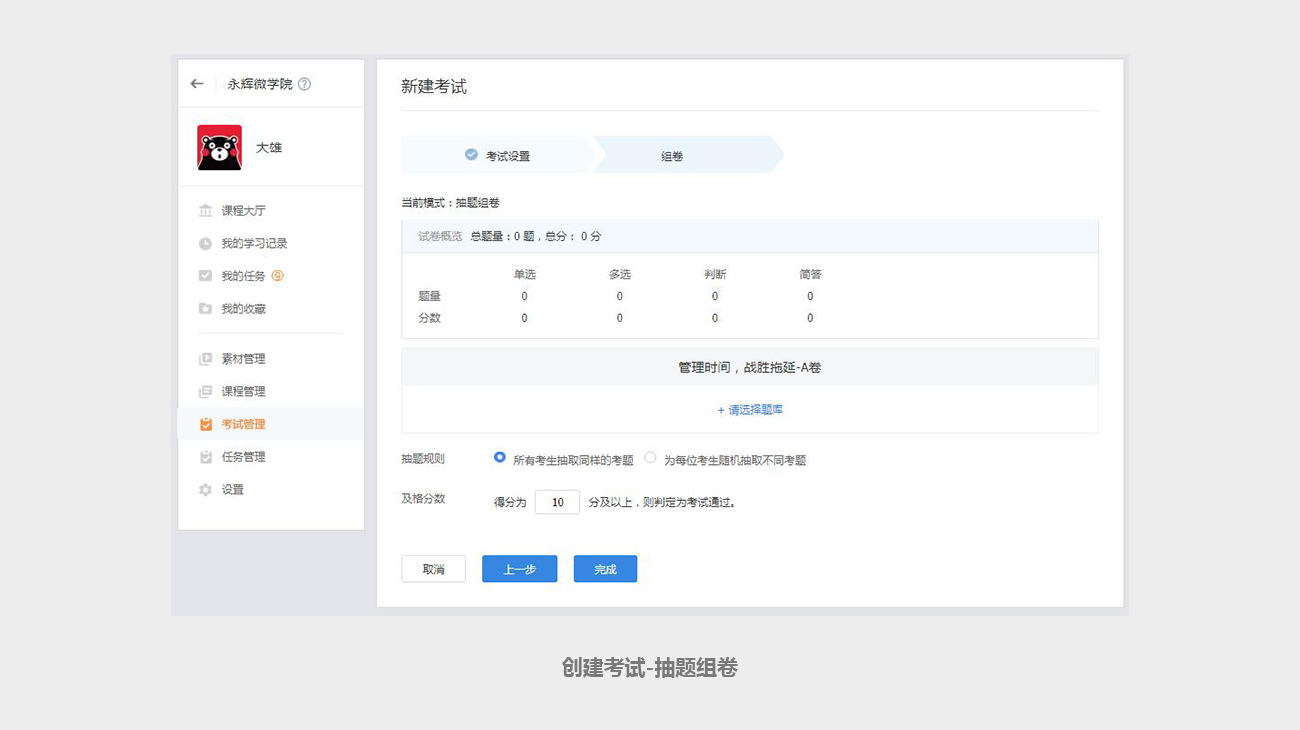
Click [Please select a question bank] to select one or more question banks.
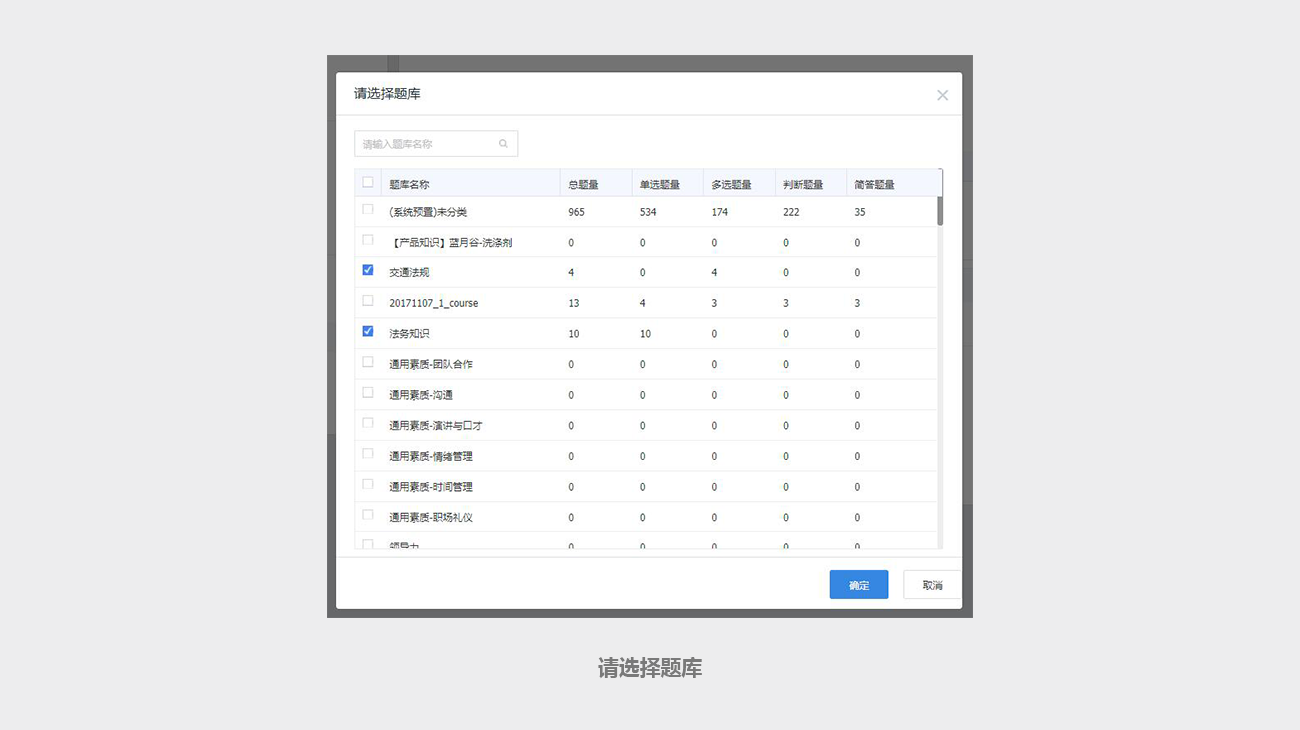
After selecting the question bank, you can set the number of selected questions and score settings for each question type in the question bank.
3) Release Exam
Method 1: Create test tasks in test management, which is applicable to the scenario where there are only test tasks.
Method 2: Create a task with an exam in task management Applicable to the scenario where a task includes both course study and exams.

After the test task is issued, editing and modification are not allowed. The system will automatically push the message of the test task to the test executor.
4) Duplicate Exam
Copying an exam is equivalent to creating a new exam, but all the information of the copied exam will be automatically brought to the new exam page. The system will verify when the copy task is saved. If the question bank in the exam subtask is deleted, it will prompt that it is not allowed to save; if the number of selected questions in the question bank is less than the amount of the question bank, it will prompt that it is not allowed to save.
5) Delete Exam
- Delete exam rules:
- Deleted exams cannot be restored, please operate with caution.
- Only exams that are not associated with tasks can be deleted.
- Deleting an exam does not delete the questions contained in the exam (it does not affect the question bank at all).
- Exams in obsolete tasks are not allowed to be deleted, but the referenced questions are allowed to be deleted (when editing, the questions in the question bank are modified).
6) View test results
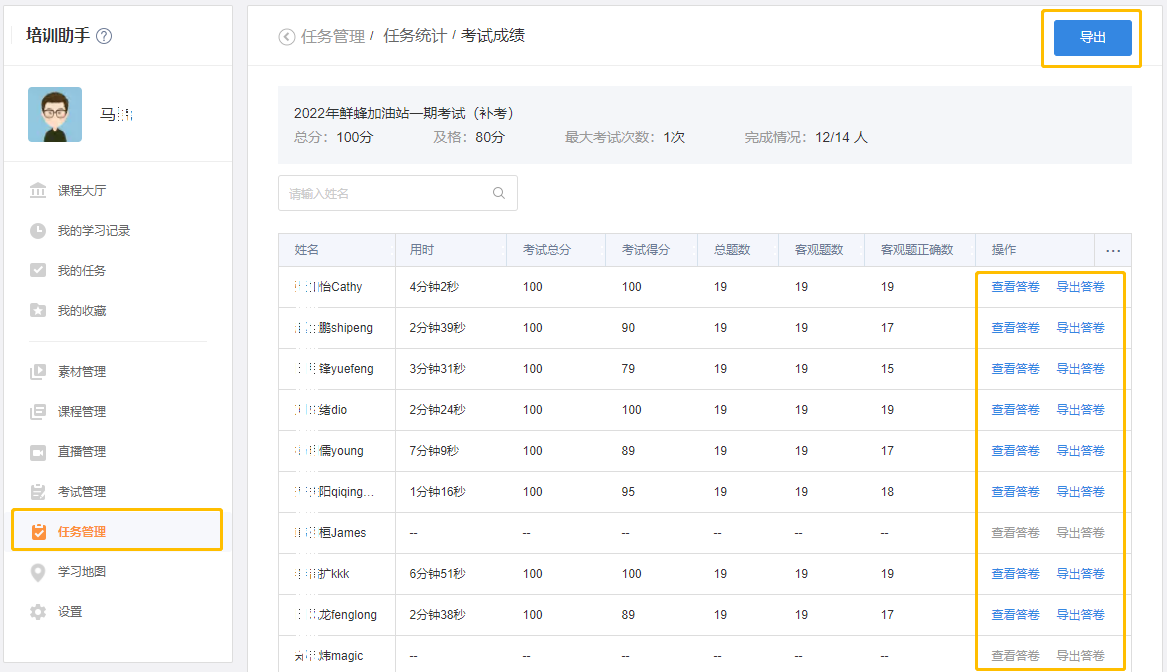
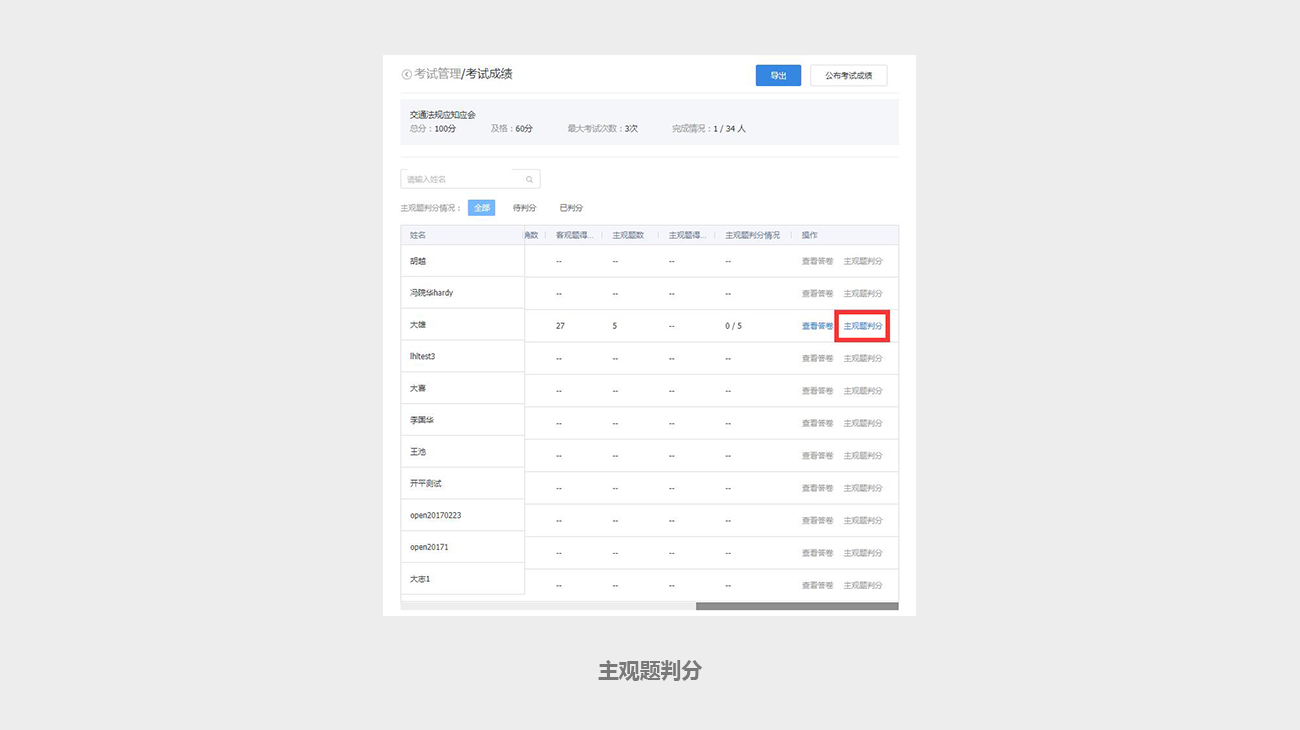
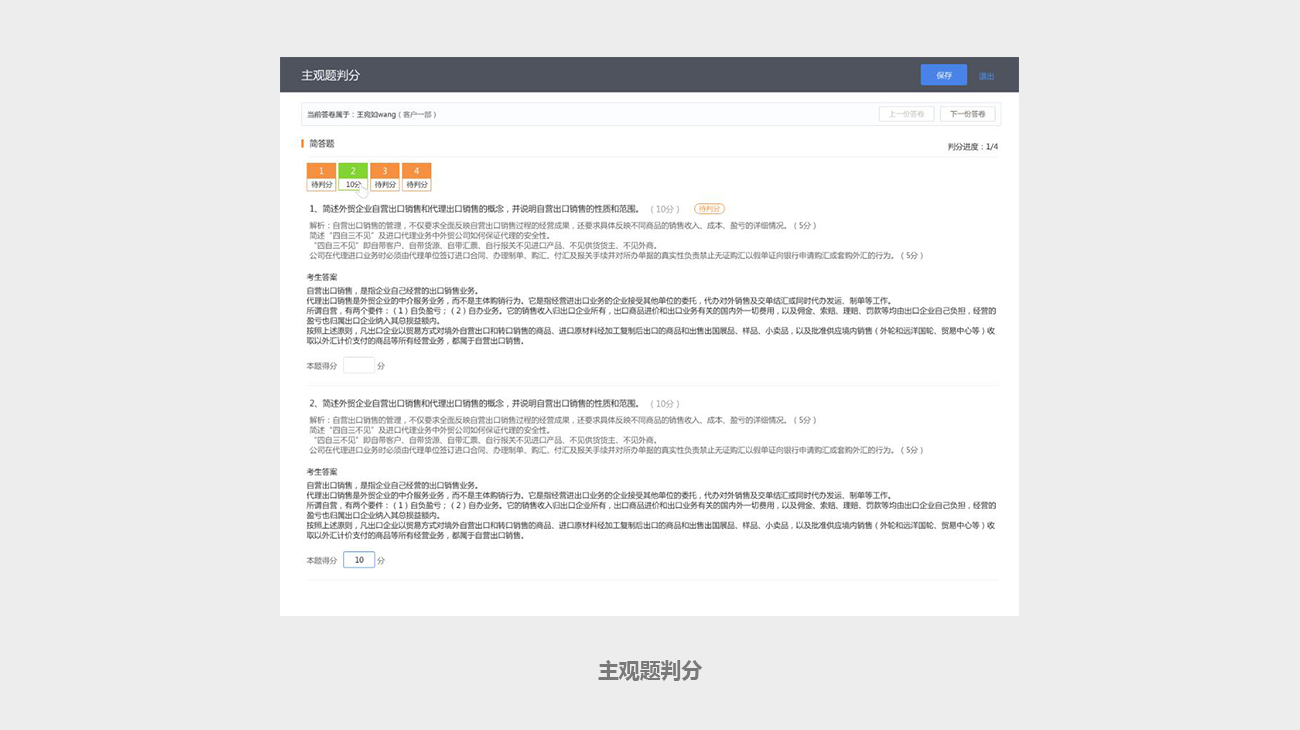
After posting the test task, you can check the test result. If there are subjective questions in the test, you can click [Subjective Question Scoring] after the test to mark and score the subjective questions. Support the export of test scores.
7) Scores for subjective questions
On the [Results] page, after the test, you can mark and judge the subjective questions
8) View Answer Sheet
On the [Results] page, you can check the candidate's answer sheet after the test

5. Task management
5.1 Overview
- Tasks: generally assigned by the administrator from top to bottom to the students to complete before the deadline, including one or more sub-tasks that must be done, which can be exam sub-tasks or course learning sub-tasks.
- Task completion progress: number of completed subtasks/total number of subtasks.
- There is a deadline for the task. After the deadline, the status of the task will change to "overdue", and the expired task can no longer be executed. Please be sure to complete the task before the deadline.
- Task types include: learning tasks, exam tasks, and learning map tasks.
- Course learning within a task must be entered from the task entrance to be effective. If the course hall has a course with the same name as the course in the task, the two are not related, and the learning progress of the self-study course in the course hall will not affect the completion progress of the task.
- A task can be completed multiple times as long as it is within the deadline. However, an exam must be completed at one time. If the exam is interrupted, the next time you enter, you need to take the exam again.
5.2 Operating instructions
Application administrators and course administrators can create, edit, publish, void, copy tasks, reminders, and view/export task statistics in [Task Management].
Permission description: The application administrator has the maximum authority and can manage all tasks. Course administrators can only manage tasks that they create.
1) Entrance: You can see the task management list
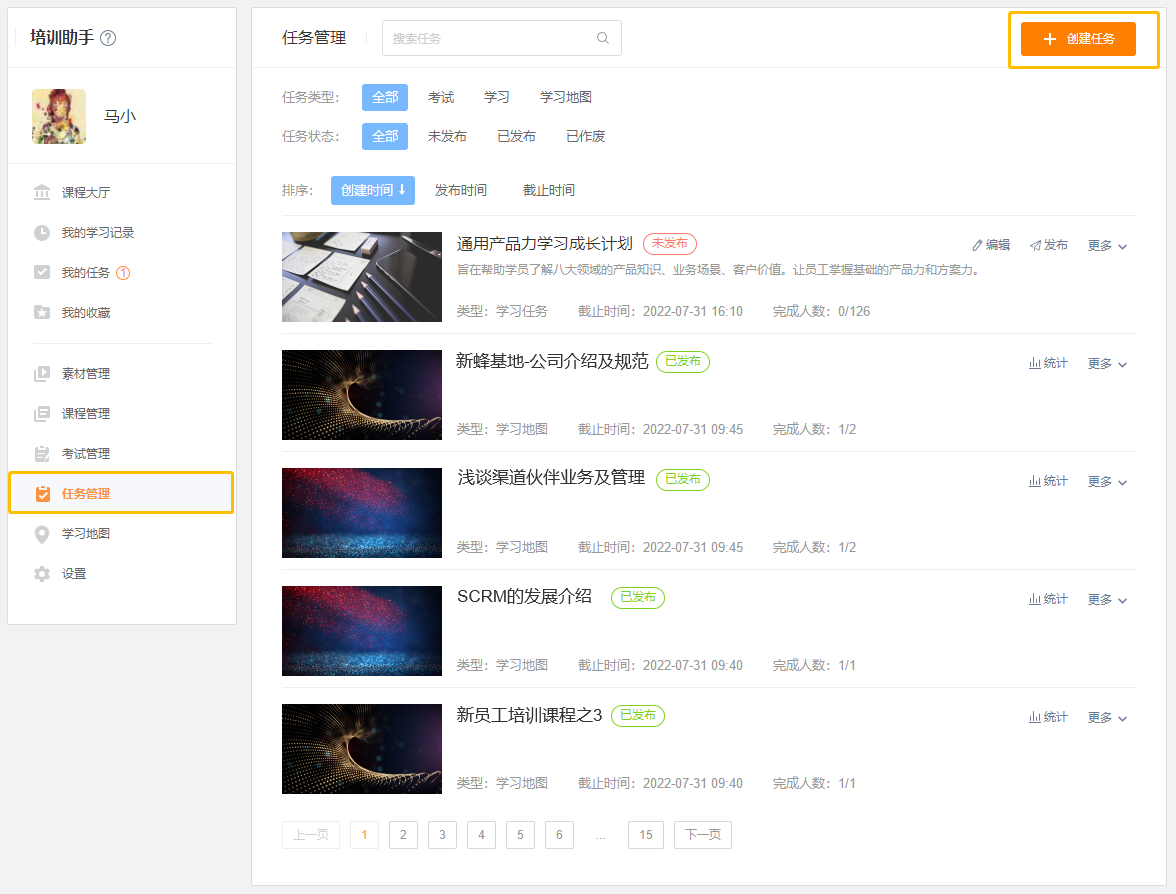
2) Create a task: Click the [Create Task] button in the upper right corner to enter the task editing page.
Note: Once the task is published, it cannot be edited or modified! the

Task Information Settings
-Task name (required): up to 50 Chinese characters, this company does not allow tasks with duplicate names.
- Task description: maximum 500 Chinese characters.
-Task cover (required): Support [local upload] and [select from gallery] two ways.
Task Content Settings
-Task type (required): exam task, study task, study map task.
- Exam tasks. Click [+Please select an exam paper] to add the created exam.
- learning assignment. It supports adding multiple learning subtasks and one test task (the test task is optional and can be added as needed). Click [+Please select a course], and the course selector will appear. Each learning subtask contains and can only contain one course, and a maximum of 20 courses can be added.
- Learn map tasks. Click [+Please select a special class] to add the created learning map special class.
* Learning Completion Standard: You can choose [Adopt a unified completion standard], or you can choose [Use the original completion standard for each class hour in each course].
[Adopt a unified finish standard] Settings include:
- Learning is complete after viewing X% of the document
- Learning is complete after watching X% of the video
- Anti-cheat mode. After it is turned on, you cannot fast-forward while watching a video.
Additional Information Settings
*Task executor (required); select person, department or position Deadline (required)
*Task deadline: xx hours xx minutes on xx month xx xxxx
*Reminder before the deadline: You can set a reminder before the deadline of the task, and the user will receive a message reminder from the training assistant.
【Save】: Perform save verification and successfully create a new task.
【Cancel】: Abandon the task creation.
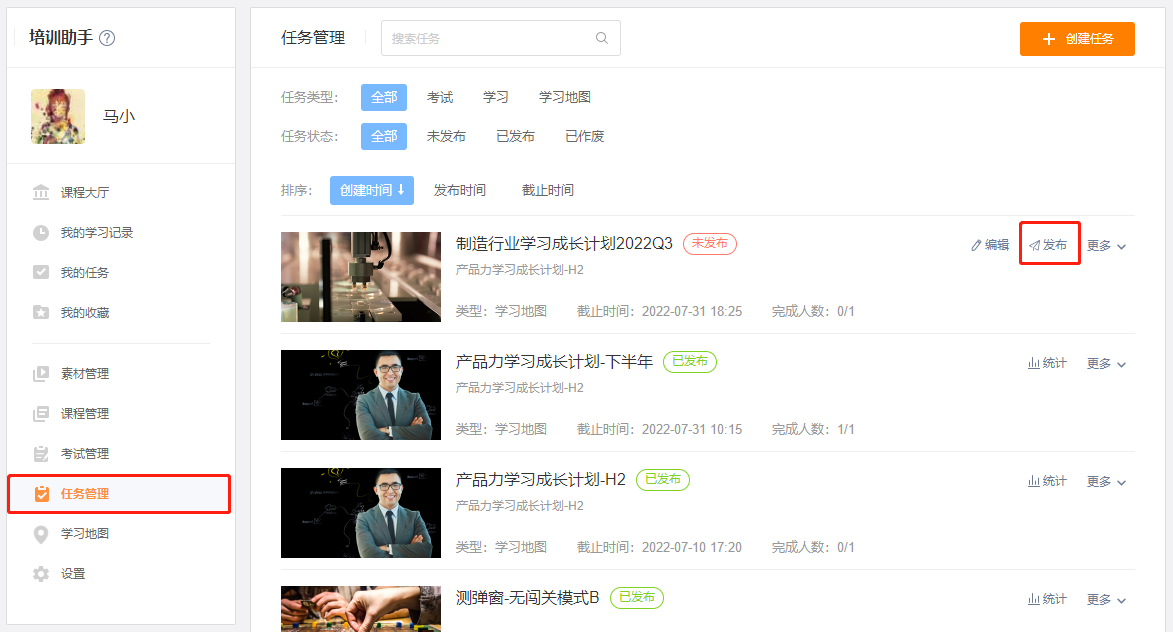
3) Publish task: On the task management list page, click the [Publish] button to publish the task.
4) Statistical analysis of tasks
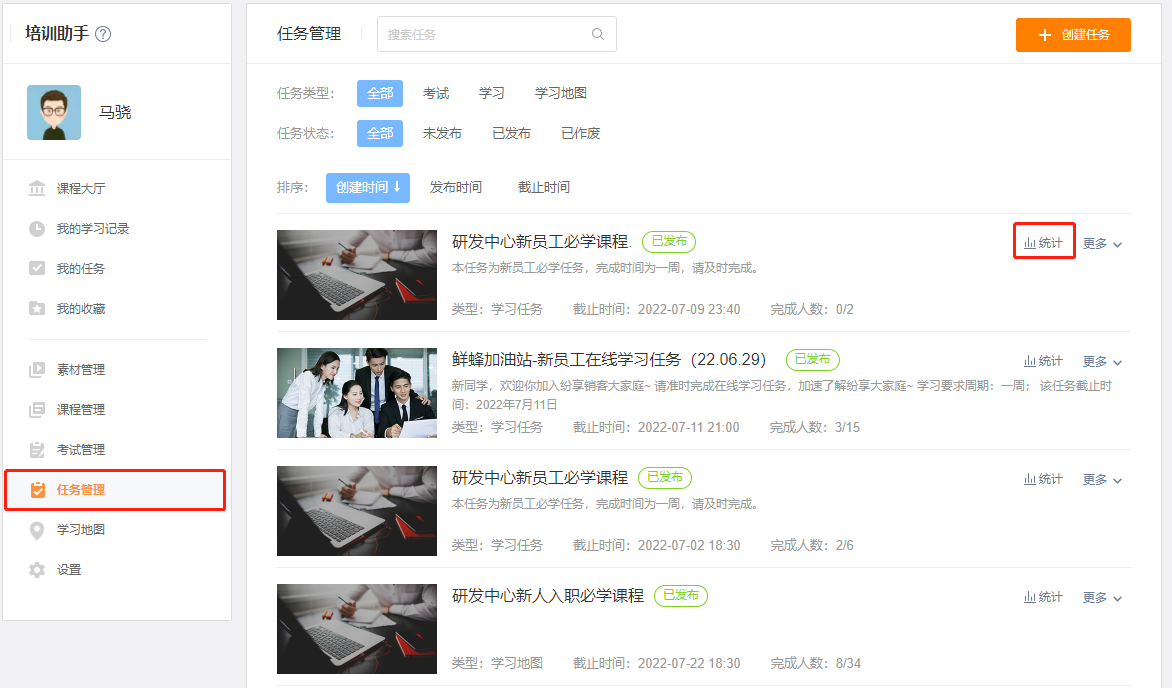
Note: For released tasks, you can view statistical analysis information such as task completion status (unpublished or obsolete tasks cannot be viewed), and the entry is as follows:
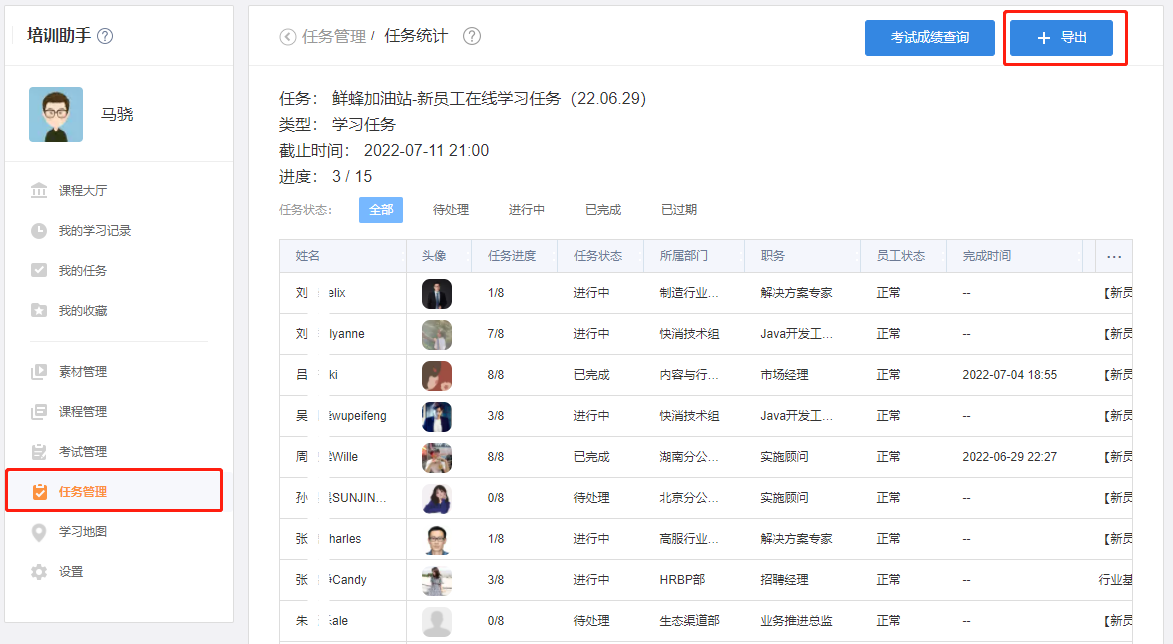
Instructions for exporting task statistics and analysis data: The statistics and analysis data of tasks can be exported as an excel file. Click the [Export] button to perform the export operation, and you can modify the file name and save address.
6. Learning map
6.1 Overview
The learning map is a series of learning plans designed around the employee's ability development path and career planning as the main axis, which is a direct reflection of the employee's learning and development path in the enterprise. It aims to help enterprises establish a systematic and scientific learning path, guide employees' learning and development, connect employees with business requirements, and build a bridge for systematic training and learning.
6.2 Product Value
1) Integrate game thinking into learning, let students bid farewell to the boring and fixed learning state, stimulate learning enthusiasm through breakthrough challenges, follow the map guide to learn in an orderly manner by course and stage, let employees devote themselves to learning with a positive attitude, and finally achieve self-improvement.
2) Students can learn the necessary knowledge of their current positions and career development channels through learning maps, learn the knowledge of promotion positions in advance, and prepare knowledge reserves for career development.
6.3 Operating Instructions
There are four steps to using a learning map:
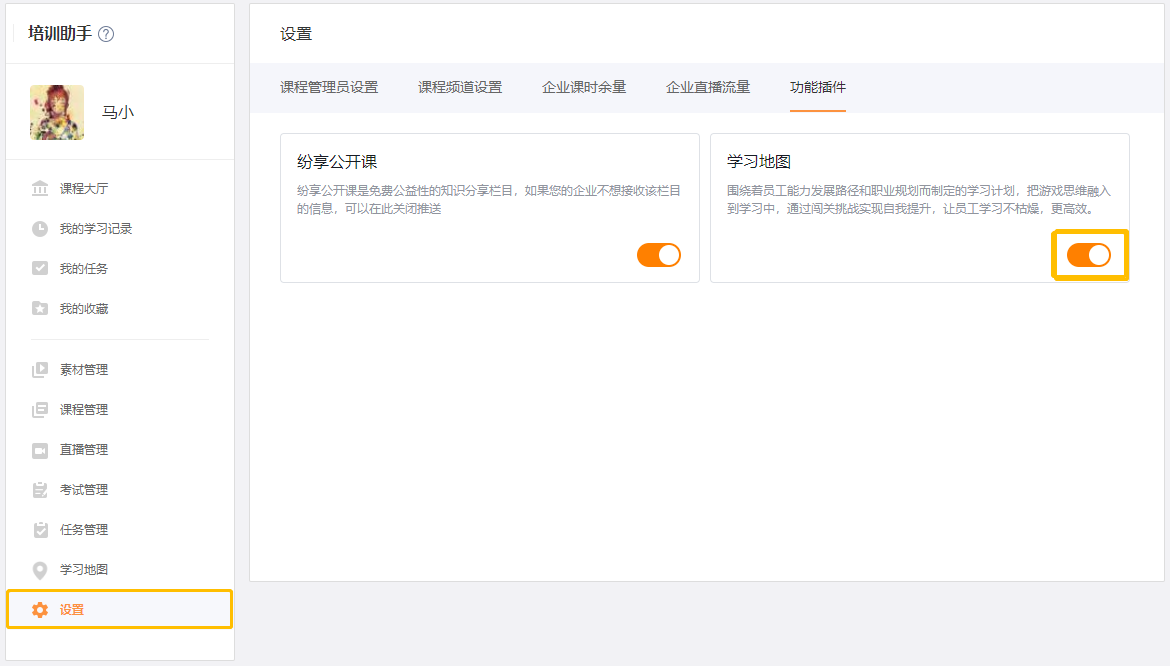
Step 1: Open the learning map function plug-in. The administrator opens the learning map plug-in in [Settings]-[Function Plug-ins]. At this time, the [Learning Map] menu will appear on the left menu bar.
Note: The learning map plug-in supports closing and opening again. After closing, the learning map menu on the management side is blocked. However, the learning map task data that has been released in the past still exists and is valid (administrators can see the historically released task records, and students can see the historically received learning map tasks).
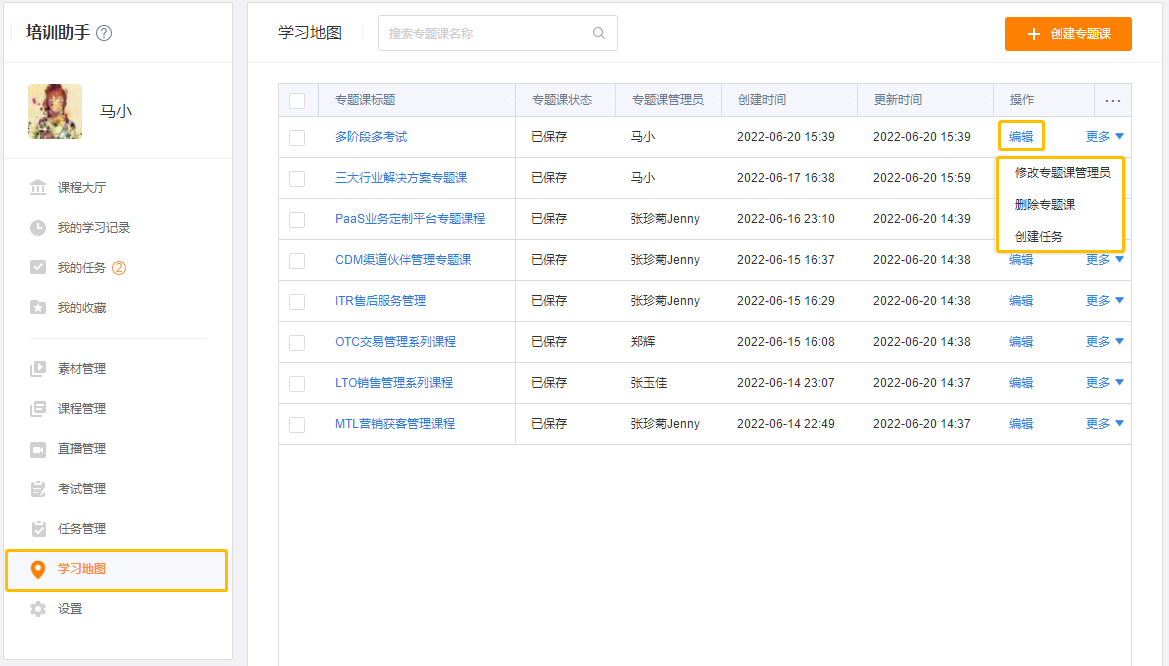
Step 2: Create a special course. In the [Learning Map] menu, click the [+Create Special Course] button in the upper right corner.
- Enter the subject title, introduction, and learning strategy.
- Choose a map template.
- If you check the "Breakthrough mode", students need to complete the current course according to the order of the courses before they can unlock the next course. When adding an exam, you can choose whether to require students to pass the exam to unlock the next course.
- Select the type of phase: single phase or multi phase. 19 courses and 1 exam can be added within each stage. Up to 10 stages can be added.
- After filling in all the information, click [Save]. the
【Operation】Support: Editing, deleting special courses, creating tasks, modifying special course administrators. the
Step 3: Release the learning map task. In the learning map list, you can select a special subject to [create task], fill in the task information and save it, then you can [publish learning map task].
- Fill in the task name, task description, and select the task cover
- Select [Learning Map Task] for the task type, + select a special course (you can view the details of the special course, replace the course, delete), and select the learning completion standard
- Select task executor, deadline, reminder before deadline, save
- On the task list page, find the task you just created, and click the [Publish] button to publish it successfully. the
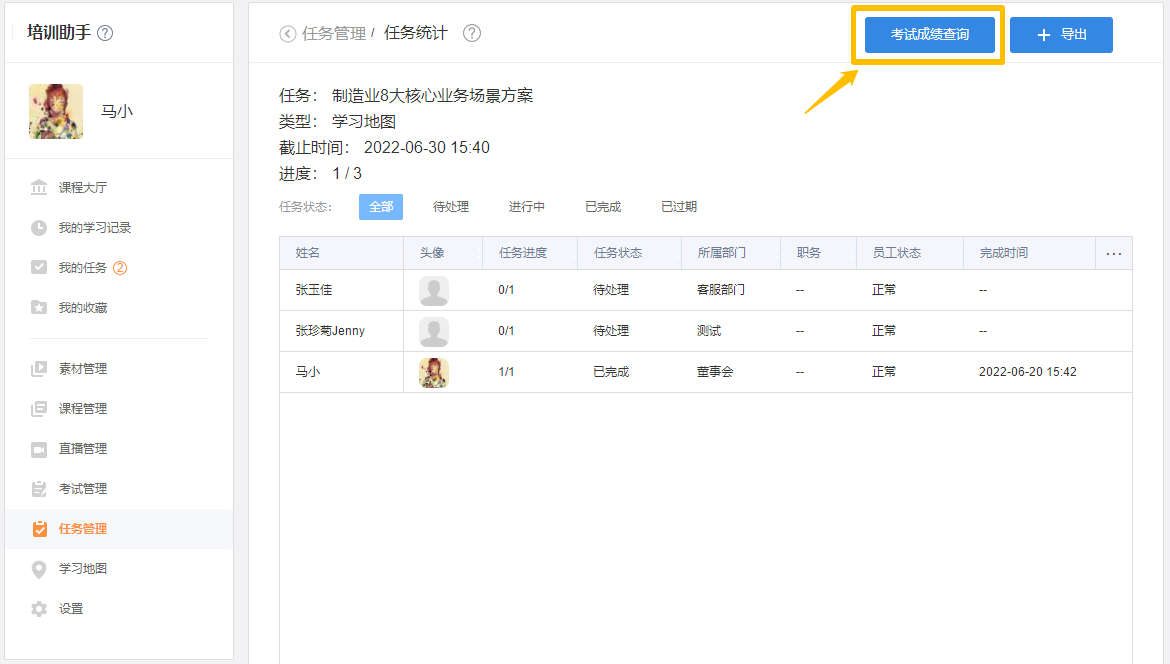
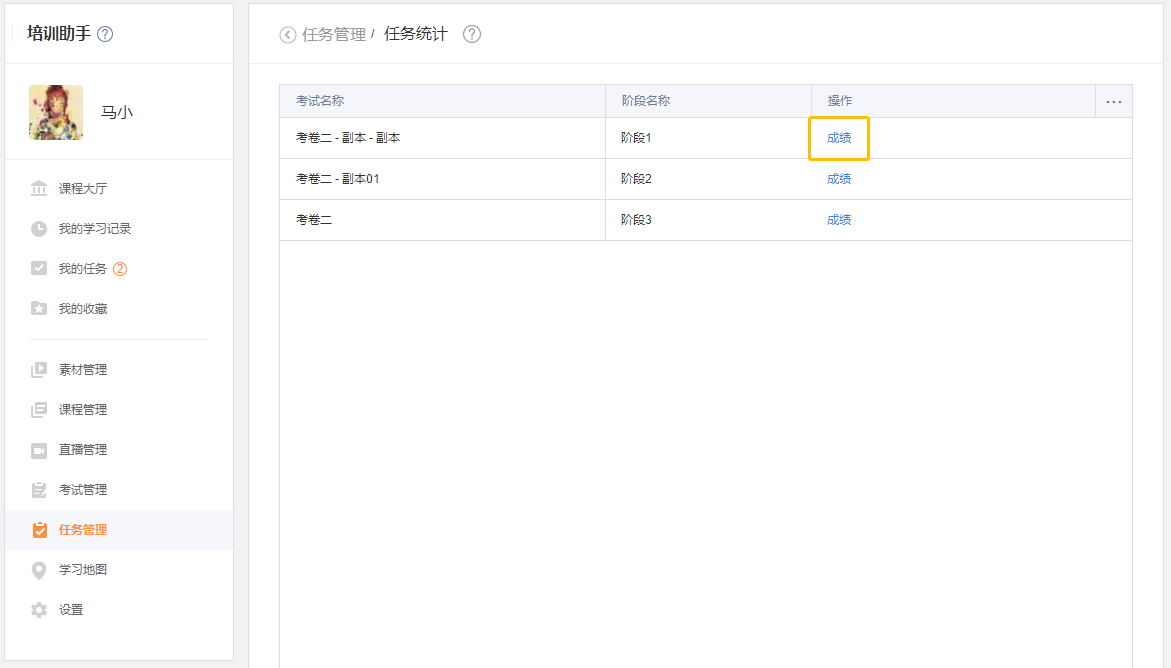
Step 4: View task statistics. You can view and export the learning status of students in [Statistics] of [Task Management]. You can also check the progress and results of the exam in real time in [Examination Result Query]. After the task is completed, you can view the answer sheet and export the answer sheet. the
Seven, administrator settings
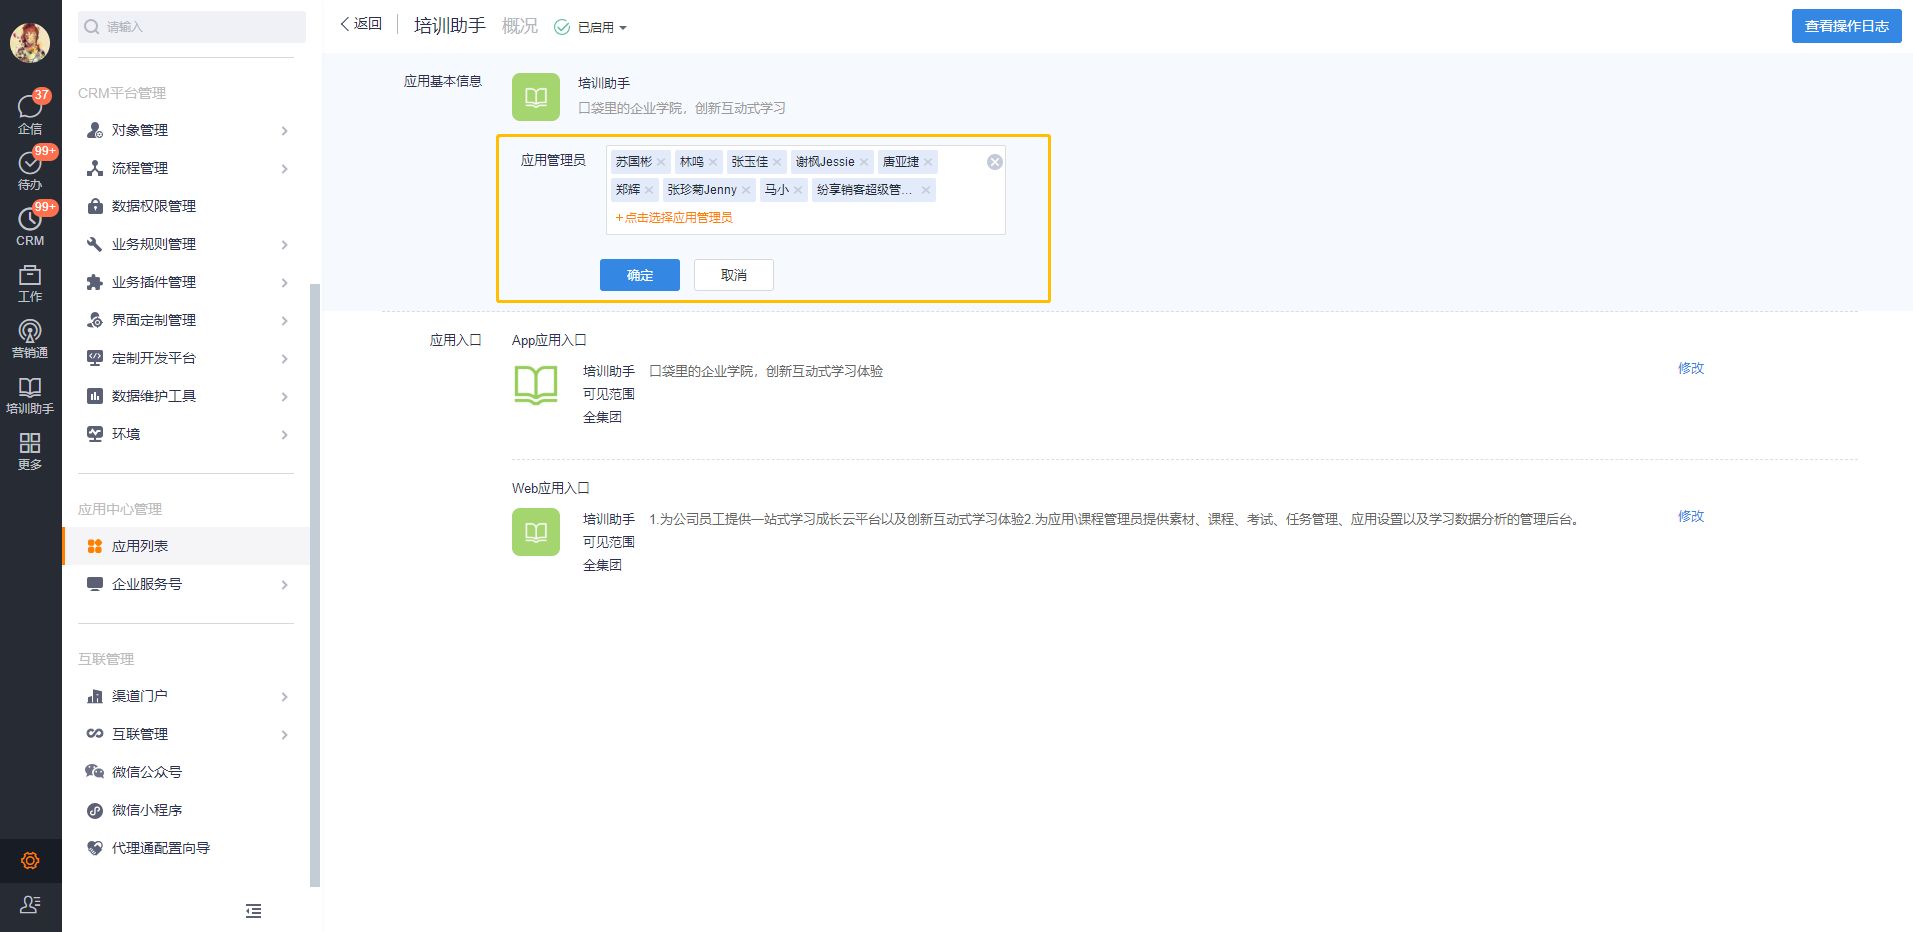
Set up Training Assistant App Admin
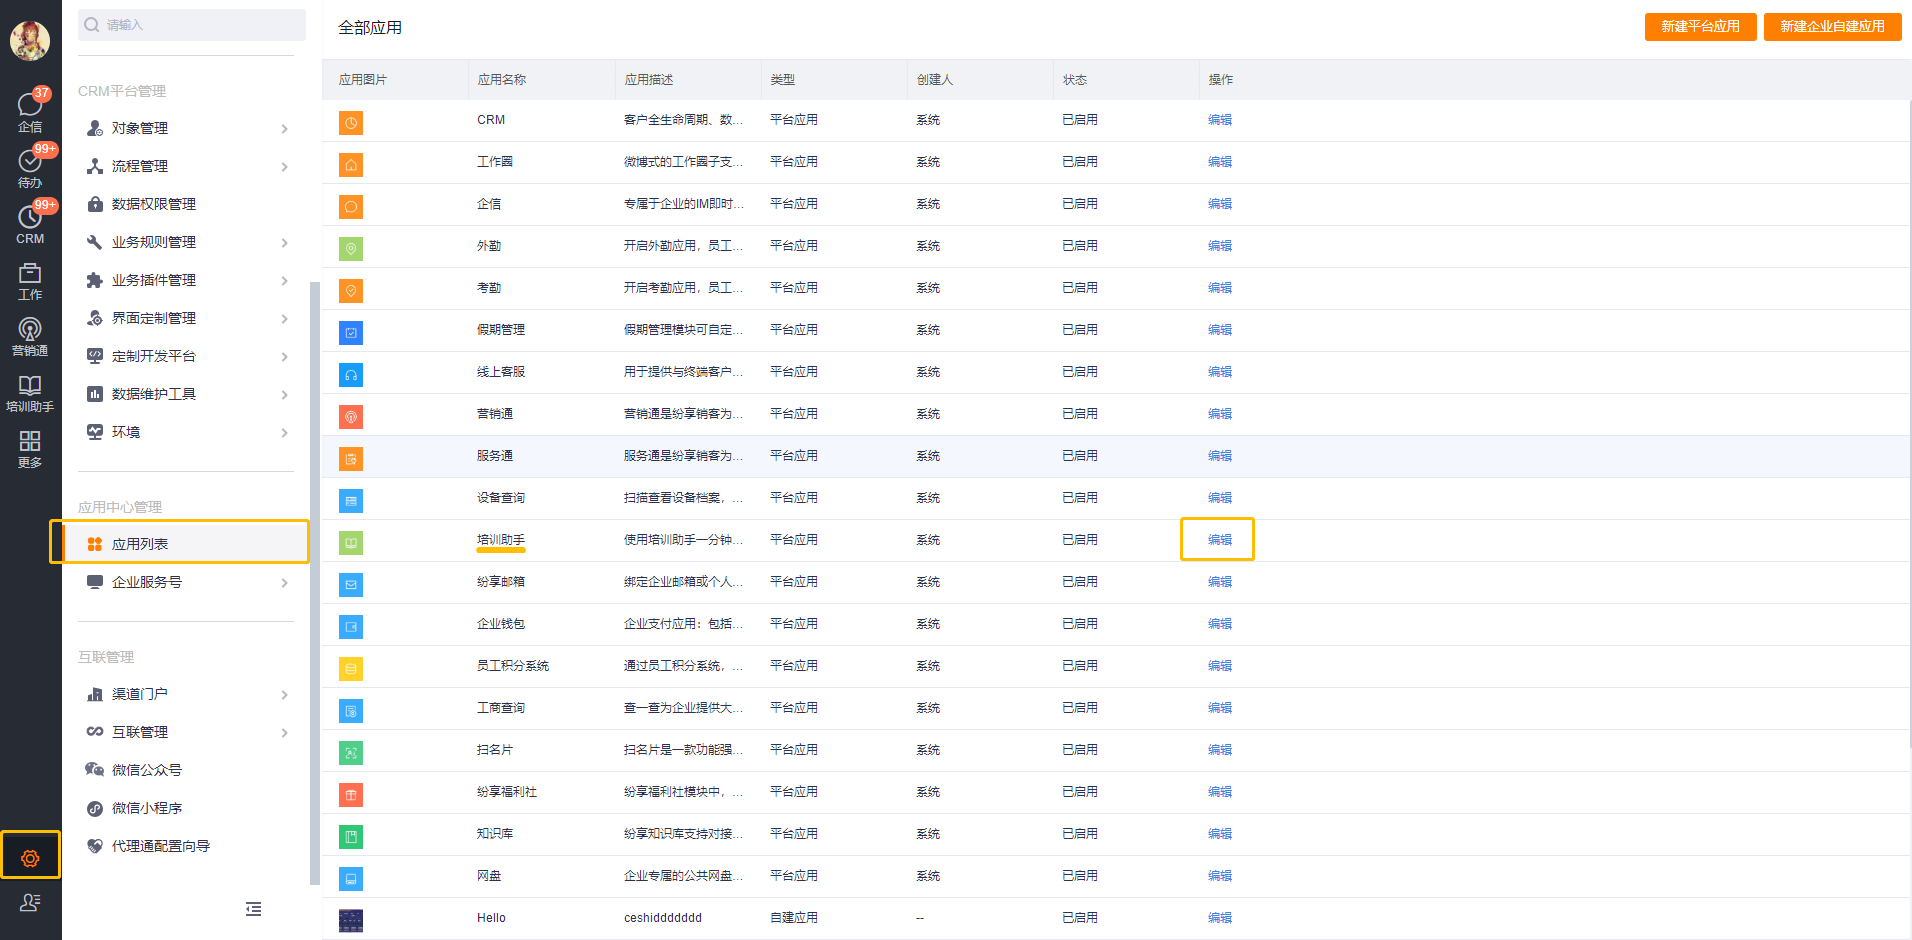
When FunShare is initially enabled, the system administrator of FunShare will be the first application administrator of the Training Assistant app by default. If you want to add a new training assistant application administrator, click [Management] - [Application List], find [Training Assistant] and click [Edit] to enter the configuration page of the training assistant application, click [Modify] on the right side of [Application Administrator] ], click [Modify] to select, add, and reduce application administrators.
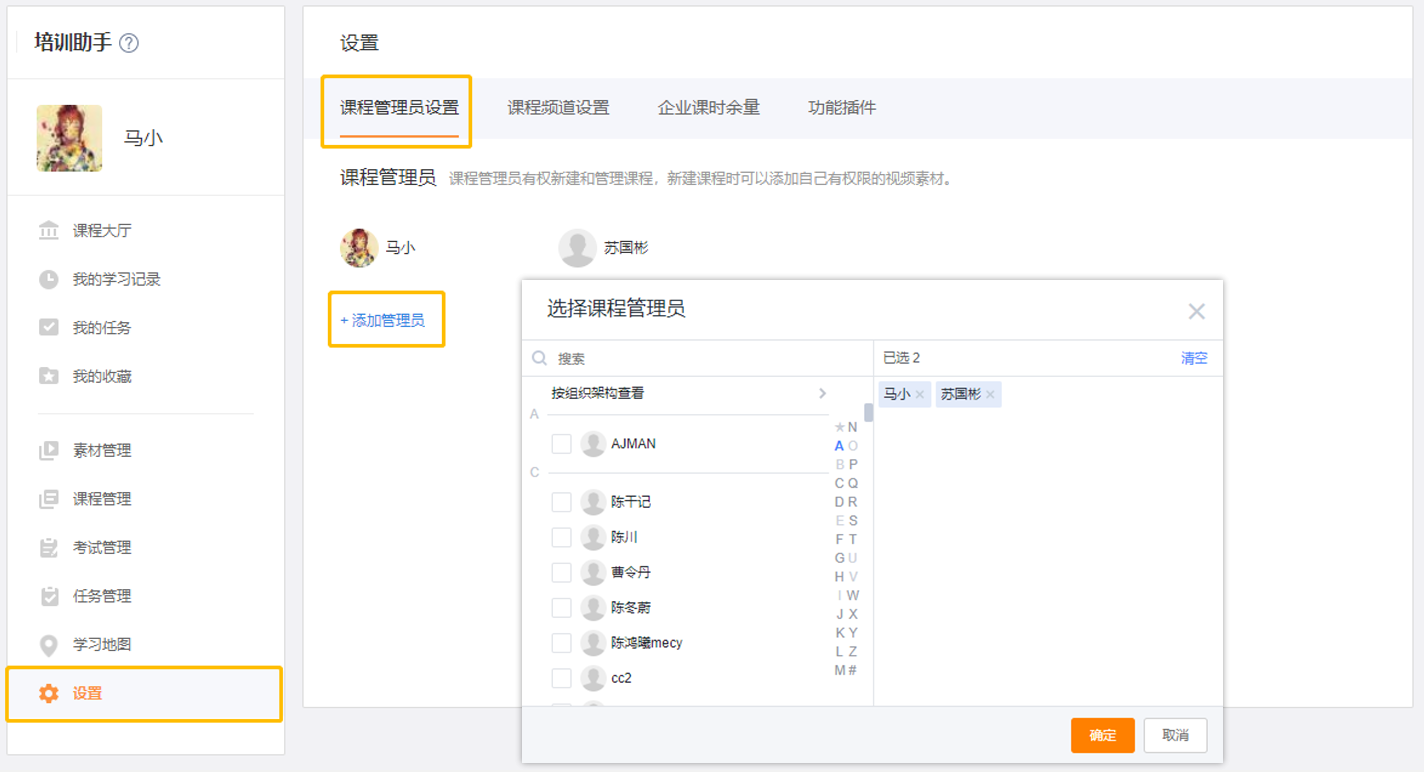
Set up course administrators
Only the application administrator has the function permission of [Settings], and can set up the course administrator. Click [Add Administrator], select an existing person in the address book, and [Save] this setting will take effect.
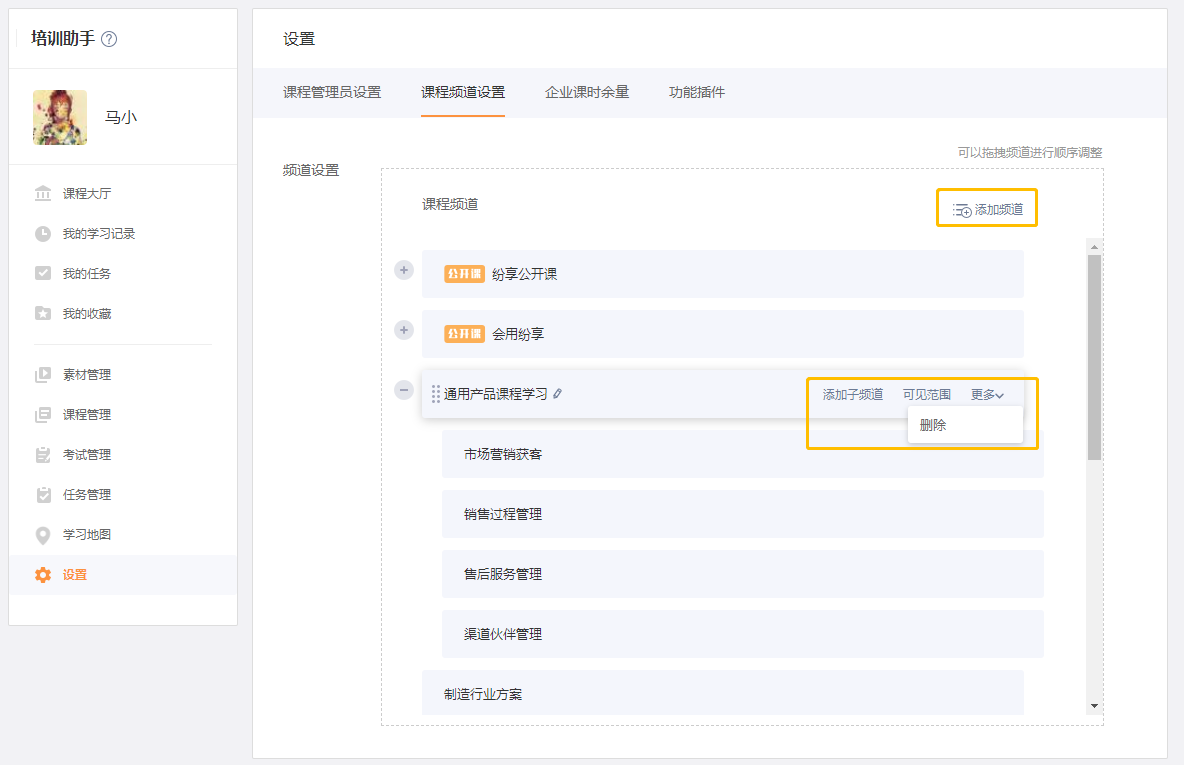
8. Course channel setting
The course channel is the first line of course classification navigation seen in the course hall. The course channel supports a maximum of 2 levels. The first-level course channel supports the setting of the visible range, and the visible course channel can be customized according to different training audiences.
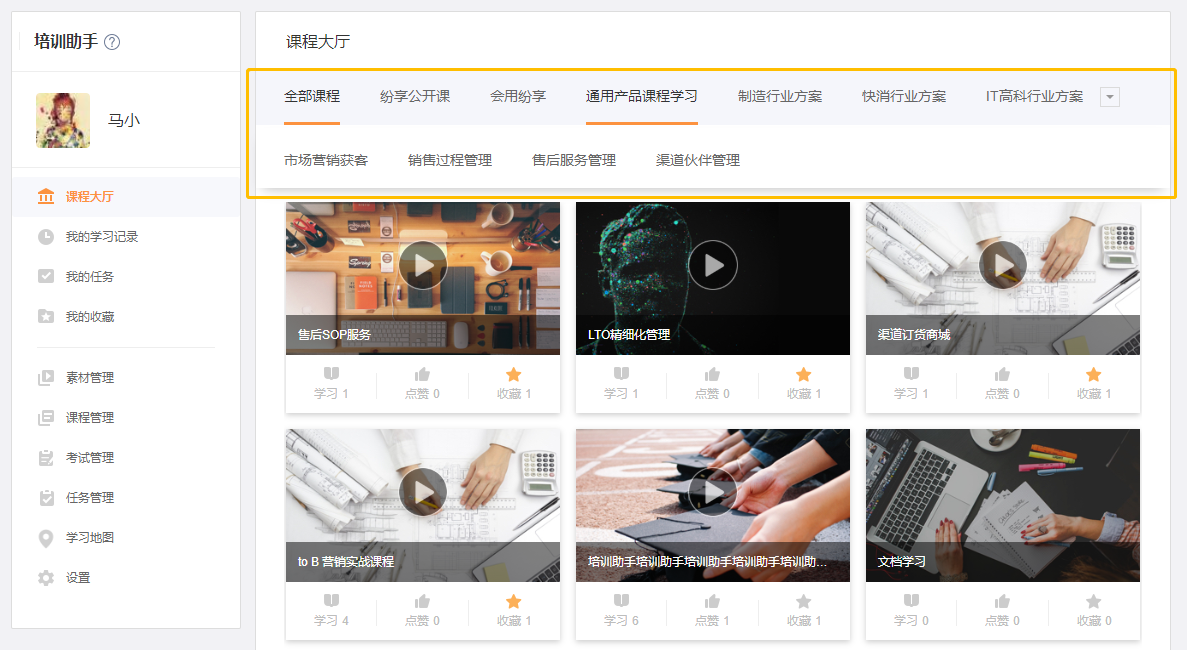
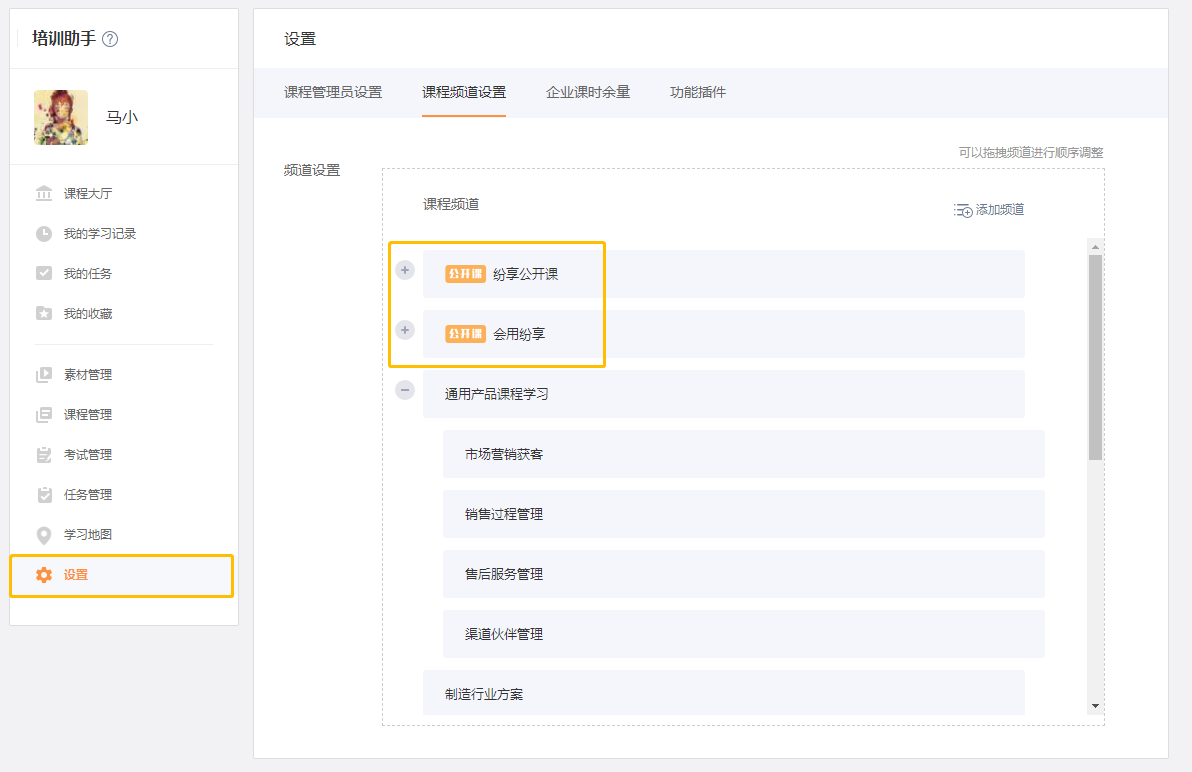
By default, the system provides 2 fixed system channels [All] and [Uncategorized] and 2 open class channels that can be started and stopped independently [Fanxiang Public Class] and [Knowledgeful Sharing]
- System channel [All]: It is the first of all channels by default, and cannot be edited. All courses will be hung under this channel, sorted by update time. No secondary channels. [Uncategorized]: By default, it is at the end of all channels and cannot be edited. All courses that are not affiliated to the specified channel will be affiliated to this channel, sorted by update time. No secondary channels.
- Self-built channel: The course channel supports a maximum of level 2 channels. The first-level course channel can set the visible range, and the second-level channel inherits the visible range of the first-level channel (but cannot be set separately). Note: Only users within the visible range of the channel can see the course channel, and can further see the authorized courses under the channel. But in the [All] and [Uncategorized] channels, you can see all the courses you have permission to see, not limited by the visible range of the first-level channel. That is, the first-level course channel is like a room, which is convenient for classifying and searching for courses. After entering the room, it depends on whether the user has permission to watch the course. If a user has the visibility scope permission of the course, the course can be used normally in all channels, uncategorized channels, and when forwarding and sharing the course details page. If there is a second-level channel under the first-level channel, the first-level channel cannot directly link courses. If there are already courses under the original first-level channel, when editing and adding a second-level channel, the system will automatically transfer the existing courses under the original first-level channel to the newly added second-level channel (pop-up window asking: "If you add a second-level channel level channel, the original level-1 channel cannot directly suspend courses, and the existing courses will be automatically transferred to the level-2 channel” to confirm or cancel this operation) When deleting an existing course channel, all courses under this channel will be deleted Automatic transfer to "Uncategorized" channel.
- Open class channel: with [Open class] icon logo. Enterprise application administrators can start, stop, sort, and view open classes, but cannot edit them.
The main operation process of setting course channel
Only the application administrator has the function permission of [Settings], and can set course channels.
【Add Channel】: Add a new first-level channel at the end.
[Rename]: The name of the course channel can be up to 6 Chinese characters. The company's course channel does not allow duplicate names.
【Sorting】: Drag and drop to sort, the second-level channel can be changed to the first-level channel by sorting, or the parent channel can be changed. First-level channels can be dragged and sorted, or linked to another first-level channel to become a second-level channel (but if the first-level channel already has a second-level channel, it is not allowed to become a second-level channel).
[Add sub-channels]: Only first-level channels can add sub-channels, and each first-level channel has a maximum of 15 second-level channels.
[Visible range]: Only the first-level channel can set the visible range, users within the range.
[Delete]: When deleting a secondary channel, if the course has been suspended, it will prompt: delete the secondary channel, and all courses under this channel will be transferred to the [Uncategorized] channel. When deleting the first-level channel, if there is a second-level channel, the second-level channel will be deleted together, and the suspended courses will be transferred to the unclassified channel. Tip: If you delete a first-level channel, the second-level channel under this channel will also be deleted, and all suspended courses will be transferred to the [Uncategorized] channel. Note: The editing of the course channel is saved in a single step, and each step of operation will take effect immediately. There is no [Save] button to save in batches.
9. Description of role permissions
The roles of the training assistant are divided into three types: application administrator, course administrator and student user.
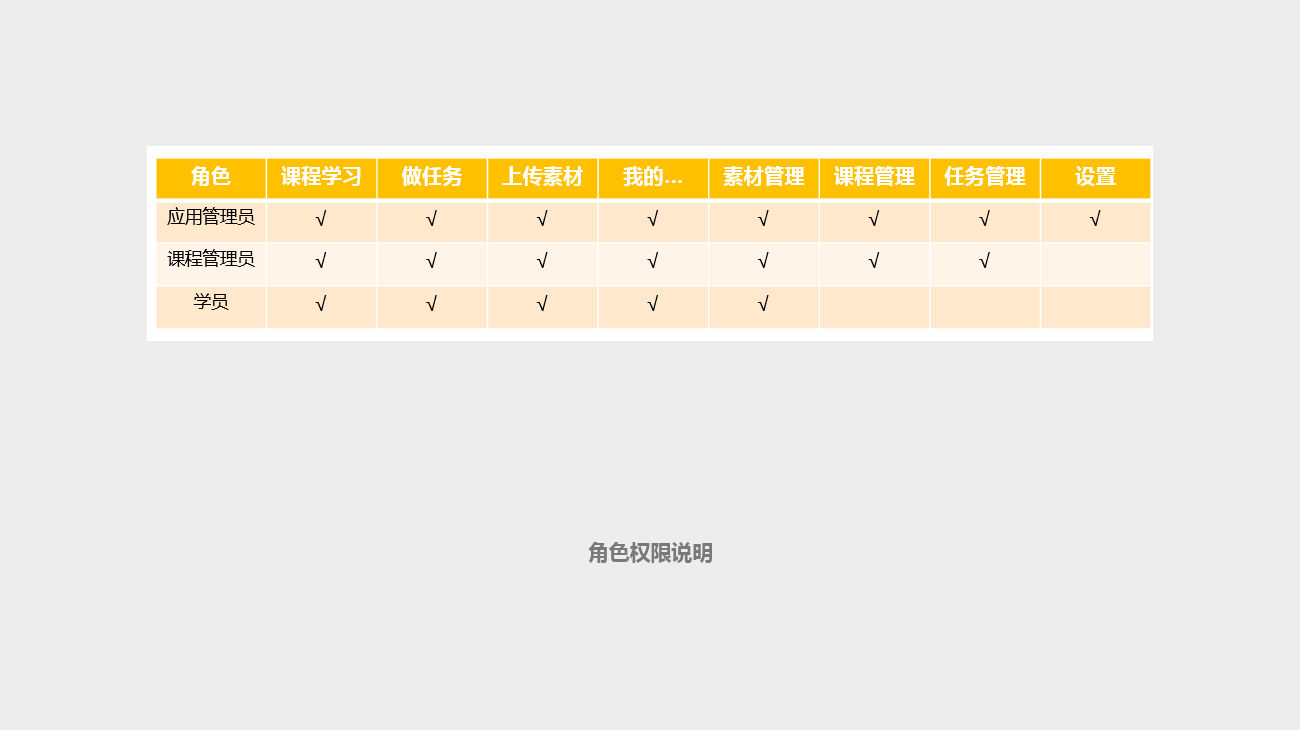
illustrate:
1. The application administrator has the maximum function authority and data scope authority (can see all the data of the whole company).
2. The data range permission of the course administrator.
3. You can only manage materials created by yourself and materials submitted to you by students.
4. You can only manage courses and tasks created by yourself.