1. Open Sogou Leads Collection Connector
Please refer to Leads Collection Connector Opening & Entry Configuration.
2. Connector Management Configuration
The main purpose of this step is to synchronize the leads data of Sogou E-Leads to the platform connector. The connector needs to be configured and generate a URL for receiving data. The following are general configuration guides, which can be modified according to the actual situation.
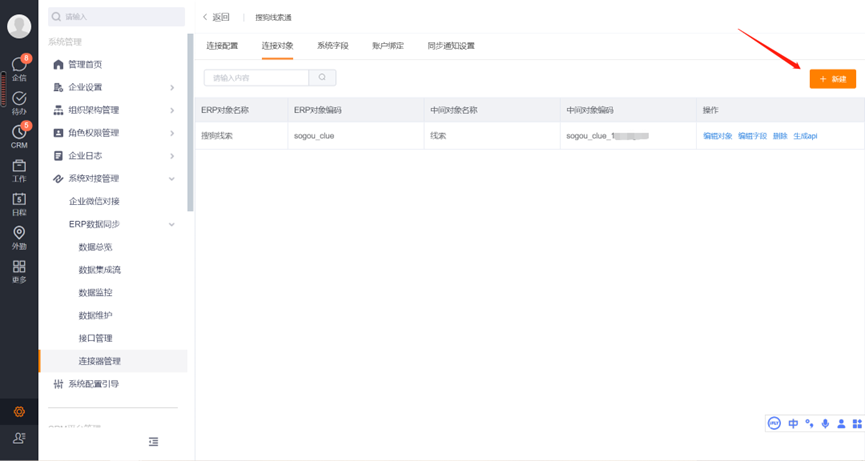
2.1 New Connection Object
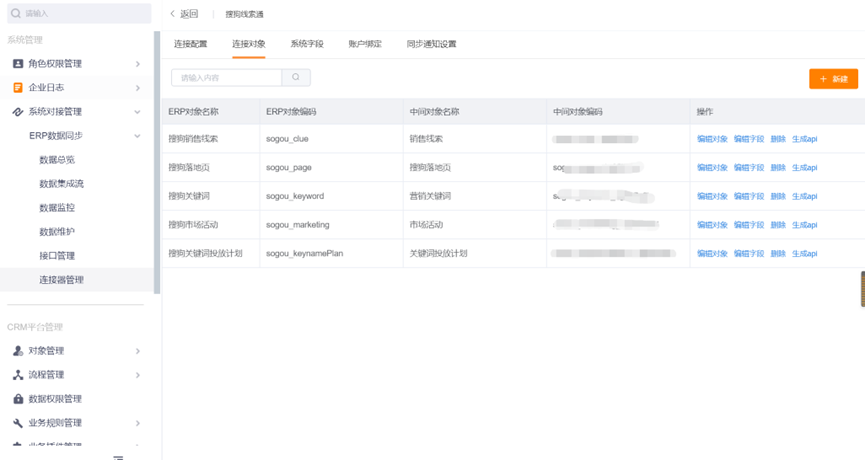
1) Enter the Sogou E-Leads connector, select the connection object tab, and click the [New] button.
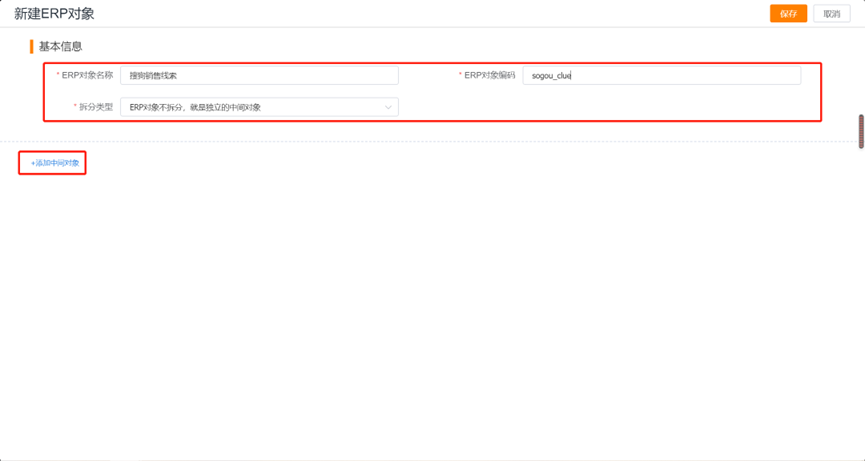
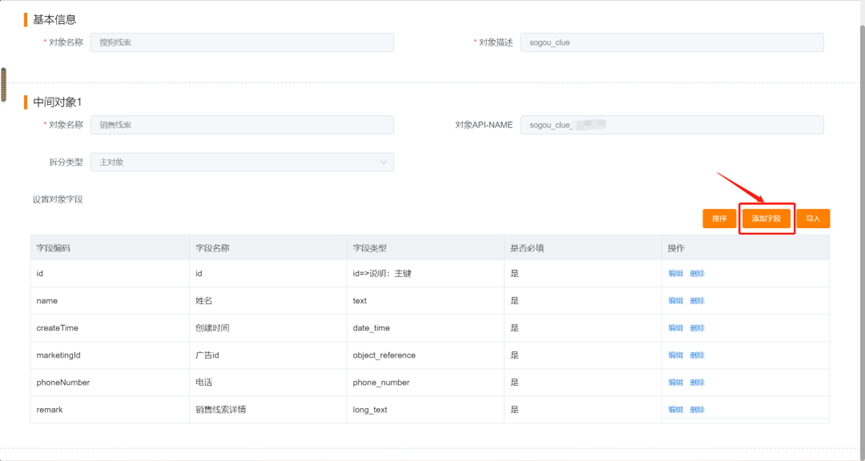
2) Fill in the basic information and click [Add Intermediate Object].
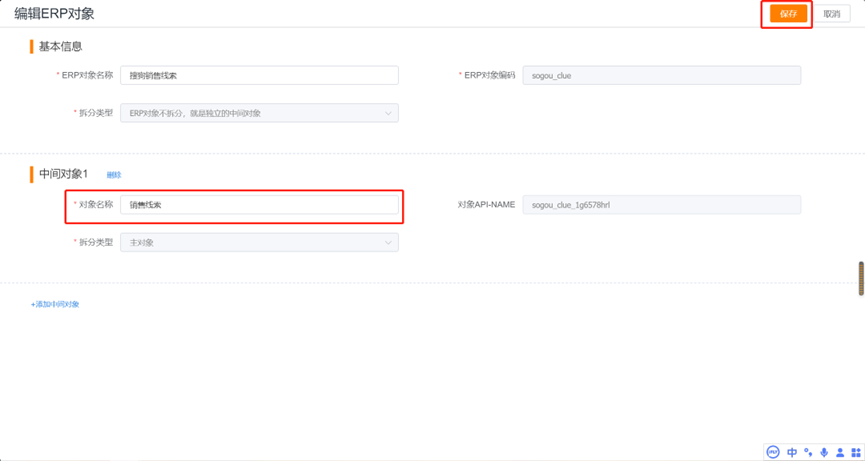
3) Fill in the name of the intermediate object, and click the [Save] button after completion.
You need to create 5 new connection objects separately, and fill in the information as follows:
| Basic Information | Intermediate Object | |||
| ERP Object Name | ERP Object Code | Split Type | Object Name | Split Type |
| Sogou Sales Leads | sogou_clue | ERP objects are not split, they are independent intermediate objects | Sales Leads | Main Object |
| Sogou Keywords | sogou_keyword | ERP objects are not split, they are independent intermediate objects | Marketing Keywords | Main Object |
| Sogou Landing Page | sogou_page | ERP objects are not split, they are independent intermediate objects | Landing Page | Main Object |
| Sogou Marketing Campaigns | sogou_marketing | ERP objects are not split, they are independent intermediate objects | Marketing Campaign | Main Object |
| Sogou Keyword Placement Plan | sogou_keynamePlan | ERP objects are not split, they are independent intermediate objects | Keyword Placement Plan | Main Object |
The completion page of new connection object is as follows:
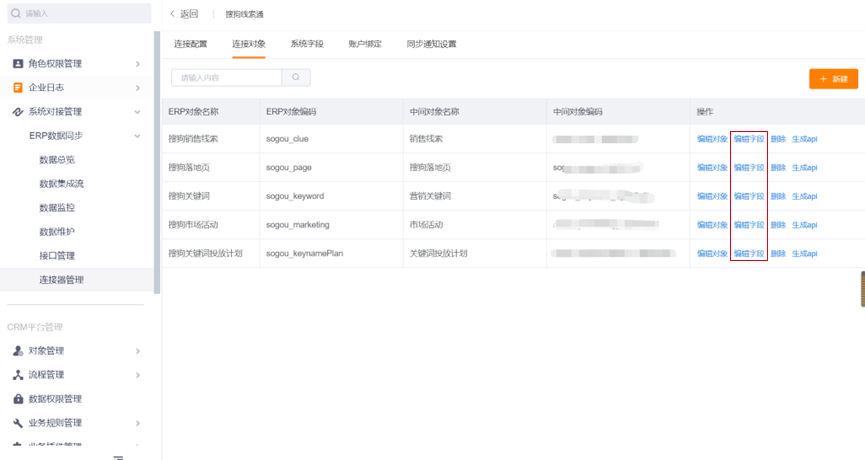
2.2 Edit Fields
1) Click the [Edit Field] button.
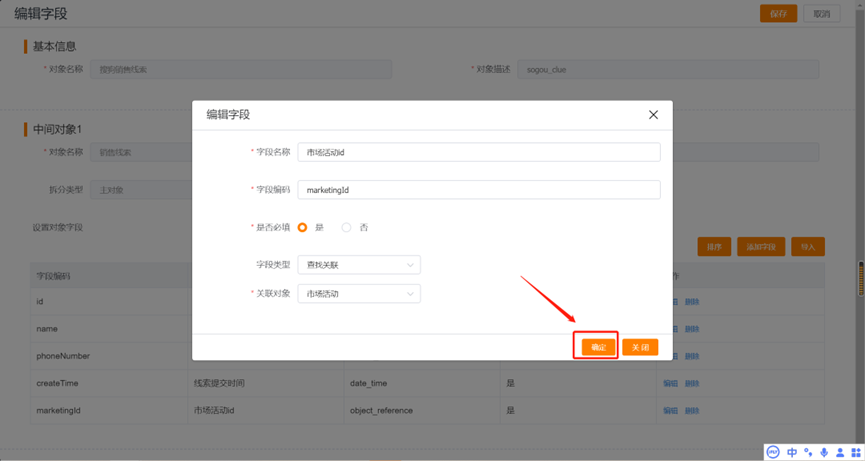
2) Enter the field editing page, click [Add Field], and fill in the field information.
For each object, the field information that needs to be filled in is as follows:
| Intermediate Object | Field Name | Field Code | Field Type | Required |
| Leads | id | id | Major Key Field | Yes |
| Name | name | Text | Yes | |
| Telephone | phoneNumber | Telephone | Yes | |
| Leads Submission Time | createTime | Date & Time | Yes | |
| Campaign id | marketingId | Find Associations: Campaigns | Yes | |
| Marketing Campaign | id | id | Major Key | Yes |
| Promotion Plan Name | planName | Text | Yes | |
| Leads Submission Time | createTime | Date & Time | Yes | |
| Owner | principal | Personnel | Yes | |
| Marketing Keywords | id | id | Major Key | Yes |
| Keywords | keywords | Text | Yes | |
| Owner | principal | Personnel | Yes | |
| Keyword Placement Plan | id | id | Major Key | Yes |
| Campaign id | marketingId | Find Associations: Campaigns | Yes | |
| Keyword id | keywordId | Find Associations: Marketing Keywords | Yes | |
| Owner | principal | Personnel | Yes | |
| Landing Page | id | id | Major Key | Yes |
| Landing Page Name | pageName | Text | Yes | |
| Landing Page url | pageUrl | Text | Yes | |
| Owner | principal | Personnel | Yes |
2.3 Insert Function to Generate Leads Receiving URL
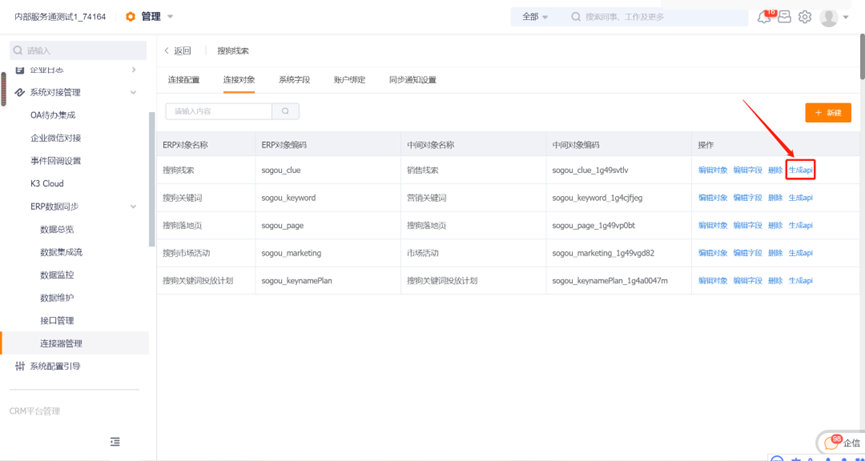
1) Click the [Generate API] button of the "Sales Leads" object to enter the API format page.
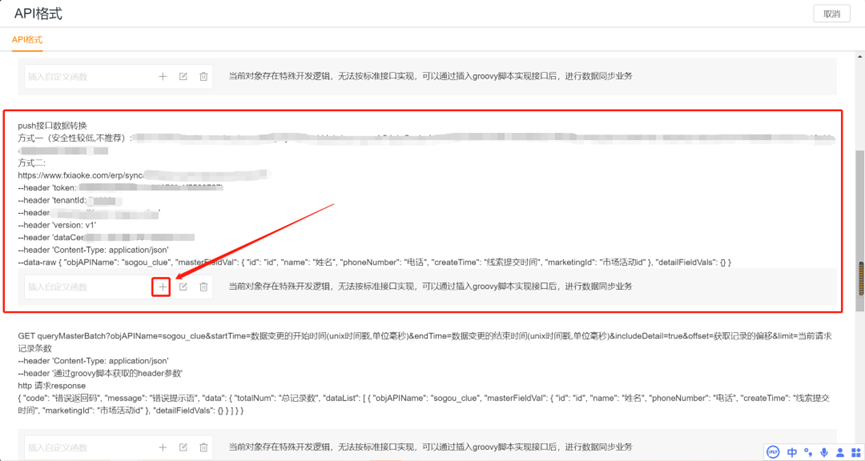
2) Click the [Add Function] button in the following position.
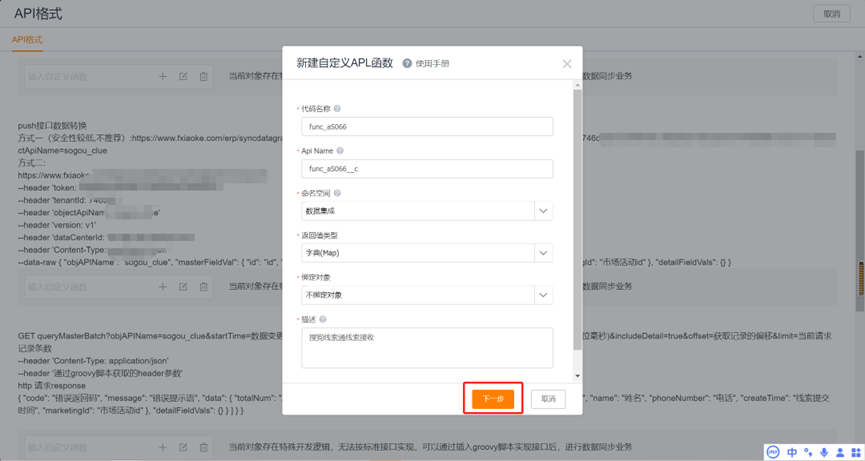
3) Fill in the description and click Next.
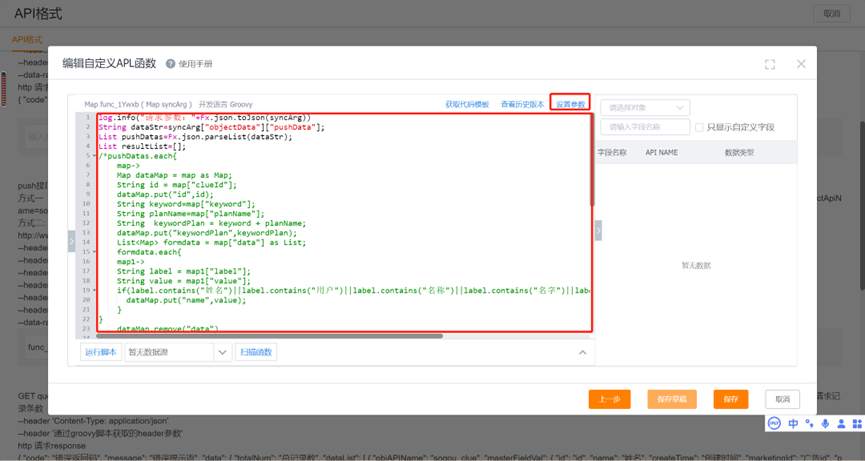
4) Copy and fill in the following functions:
log.info("Request parameter: "+Fx.json.toJson(syncArg))
String dataStr=syncArg["objectData"]["pushData"];
List pushDatas=Fx.json.parseList(dataStr);
List resultList=[];
pushDatas. each {
    map->
    //Sogou marketing activities
    Map<String,String>sogou_marketing=[:];
    String createTime=map["createTime"];
    sogou_marketing. put("createTime", createTime);
    String planName=map["planName"];
    sogou_marketing.put("planName", planName);
    String marketingId = Fx.crypto.MD5.encode(planName);
    sogou_marketing.put("id",marketingId);
    sogou_marketing.put("principal","10000");
    resultList.add(["objAPIName":"sogou_marketing","masterFieldVal":sogou_marketing])
      //marketing leads
    Map<String,String>sogou_clue=[:];
    List<Map> formdata = map["data"] as List;
    formdata. each {
    map1->
    String label = map1["label"];
    String value = map1["value"];
    if(label.contains("Name")||label.contains("User")||label.contains("Name")||label.contains("Name")||label.contains("Name") ||label.contains("your last name")){
      sogou_clue.put("name",value);
    }
    }
    String phoneNumber=map["phoneNumber"];
    sogou_clue.put("phoneNumber",phoneNumber);
    String clueId = map["clueId"];
    sogou_clue.put("id",clueId);
    sogou_clue.put("marketingId",marketingId);
    resultList.add(["objAPIName":"sogou_clue","masterFieldVal":sogou_clue])
      //marketing keywords
    Map<String,String>sogou_keyword=[:];
    String keyword=map["keyword"];
    String keywordId = Fx.crypto.MD5.encode(keyword);
    sogou_keyword.put("id",keywordId);
    sogou_keyword.put("keyword",keyword);
    sogou_keyword.put("principal","10000");
    resultList.add(["objAPIName":"sogou_keyword","masterFieldVal":sogou_keyword])
    //Sogou Keyword Delivery Plan
    Map<String,String>sogou_keynamePlan=[:];
    String keywordPlan = keyword + planName;
    sogou_keynamePlan.put("keywordPlan",keywordPlan);
    String keynamePlanId = Fx.crypto.MD5.encode(keywordPlan);
    sogou_keynamePlan.put("id",keynamePlanId);
    sogou_keynamePlan.put("marketingId",marketingId);
    sogou_keynamePlan.put("keywordId",keywordId);
    sogou_keynamePlan.put("principal","10000");
   resultList.add(["objAPIName":"sogou_keynamePlan","masterFieldVal":sogou_keynamePlan])
      //landing page
    Map<String,String>sogou_page=[:];
    String pageName=map["pageName"];
    String pageUrl=map["pageUrl"];
    String pageUrlId = Fx.crypto.MD5.encode(pageUrl);
    sogou_page.put("id", pageUrlId);
    sogou_page.put("pageName", pageName);
    sogou_page.put("pageUrl", pageUrl);
    sogou_page.put("principal","10000");
    resultList.add(["objAPIName":"sogou_page","masterFieldVal":sogou_page])
}
return ["dataList":resultList];//return array type
5) Paste the copied function and set parameters.
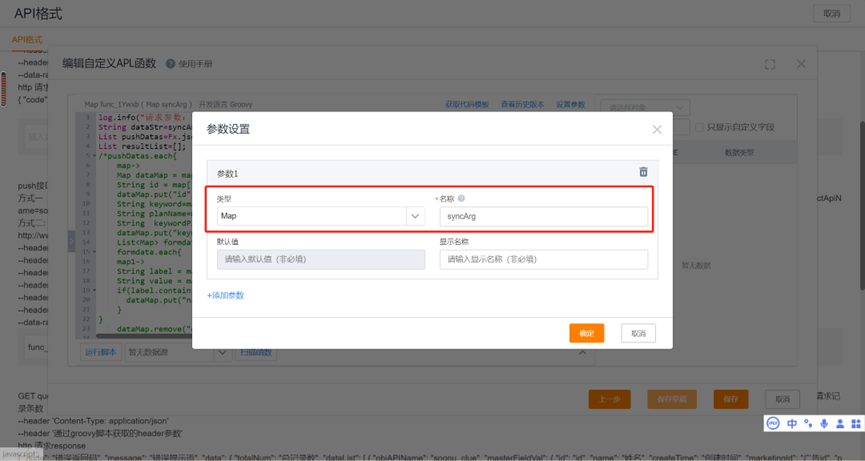
6) Save the function after completion, and finally copy the API address generated as follows, and go to Sogou E-Leads to paste the binding address (For details, please refer to 4. Bind Leads Receiving URL in Sogou E-Leads).

3. Connector Data Integration Flow Configuration
The main purpose of this step is to synchronize the data which is synchronized from Sogou to the connector to CRM according to the integration flow rules. The following is the configuration guide for preset fields. The fields and field values that need to be synchronized should be configured according to the actual situation.
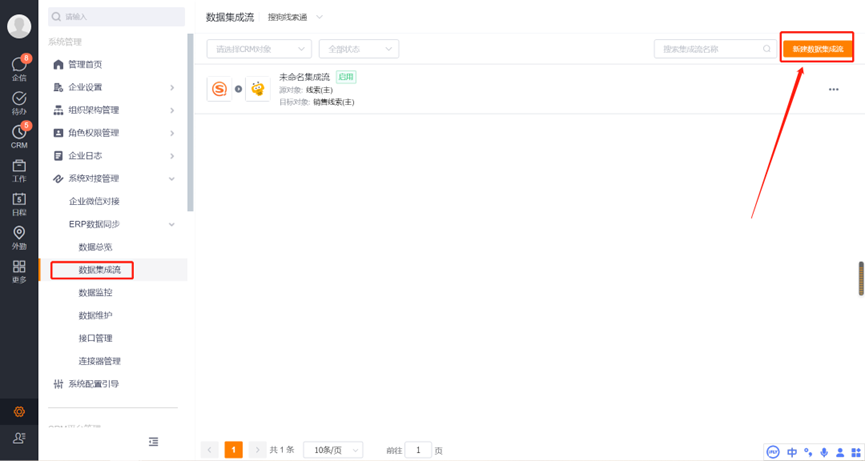
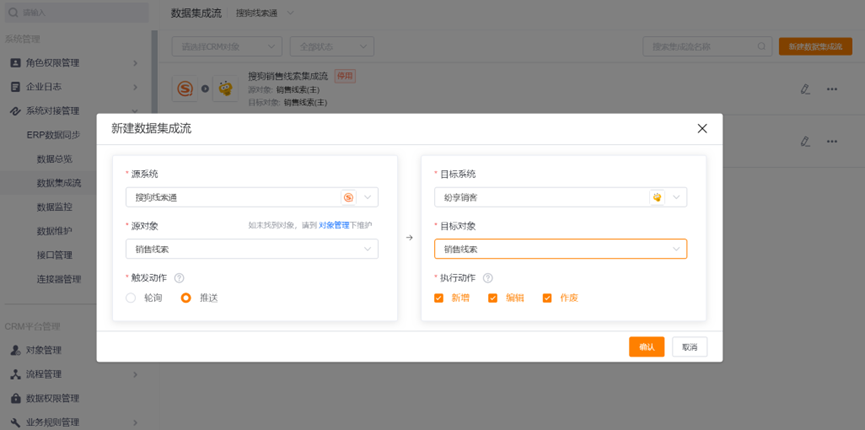
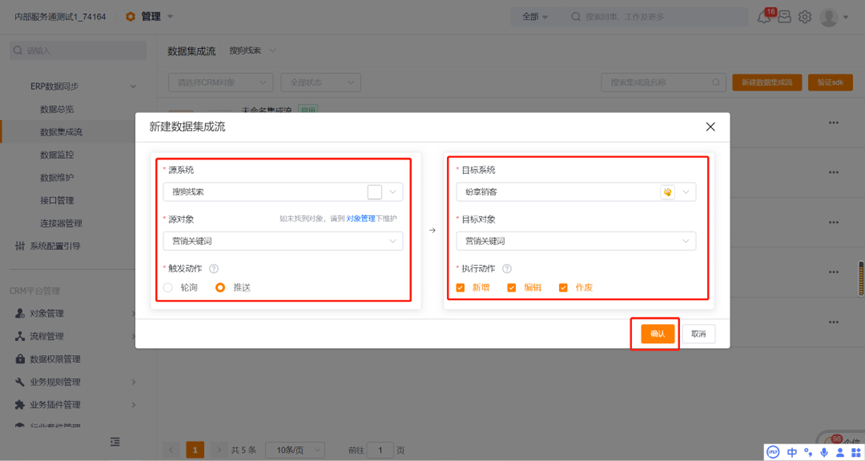
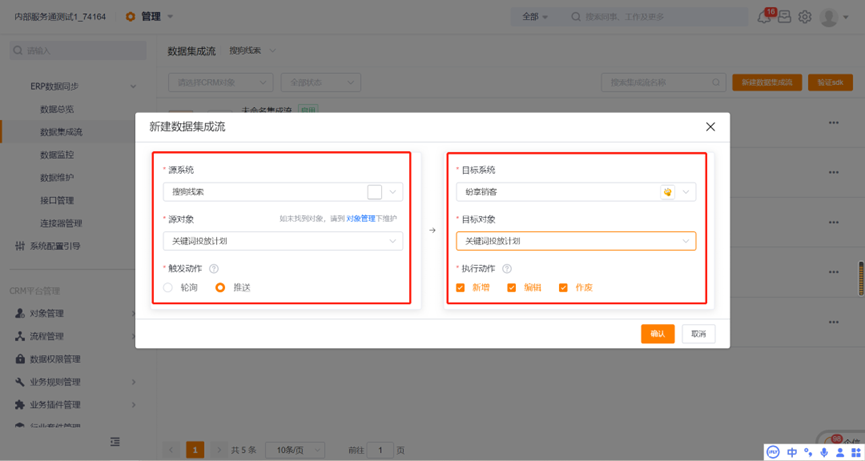
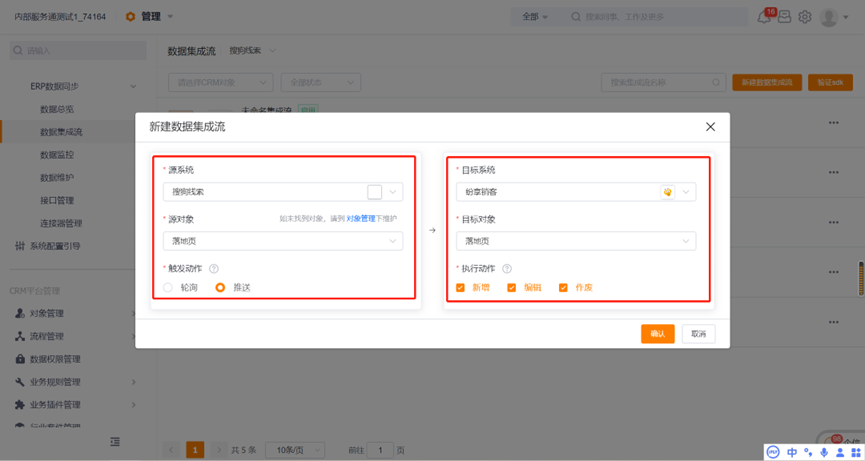
1) Enter the [Data Integration Flow] page, and click [New Data Integration Flow] to add an integration flow.
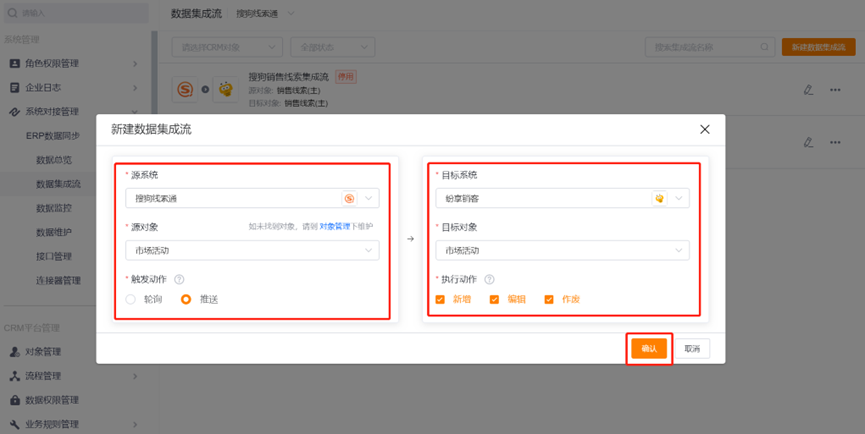
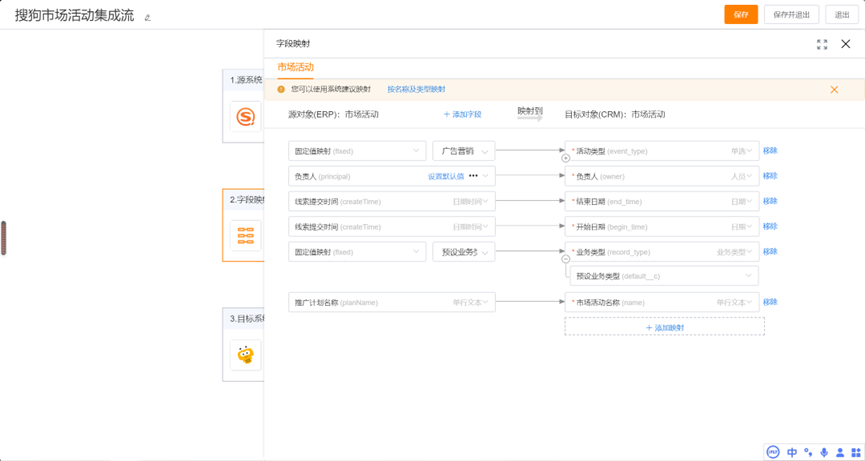
a. Add Campaign Integration Flow
Select the source system/source object and target system/target object as shown in the figure below.
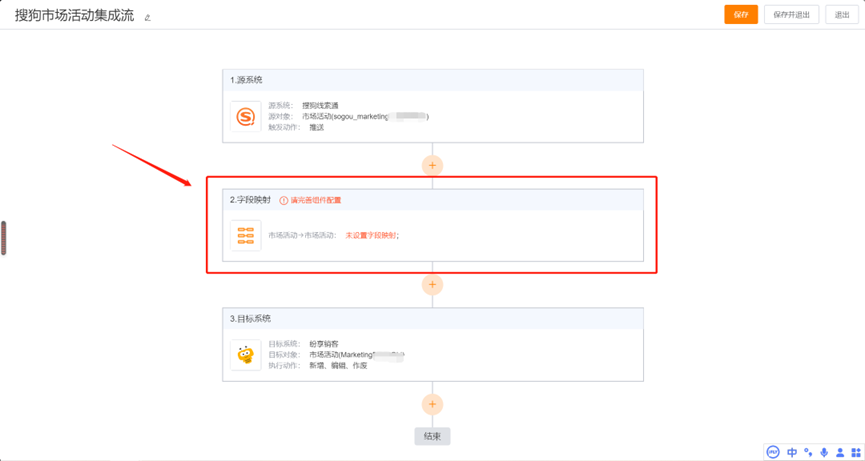
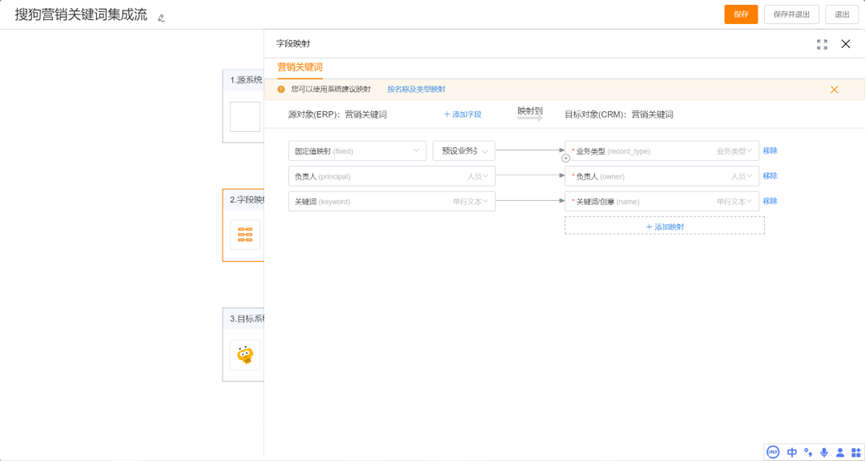
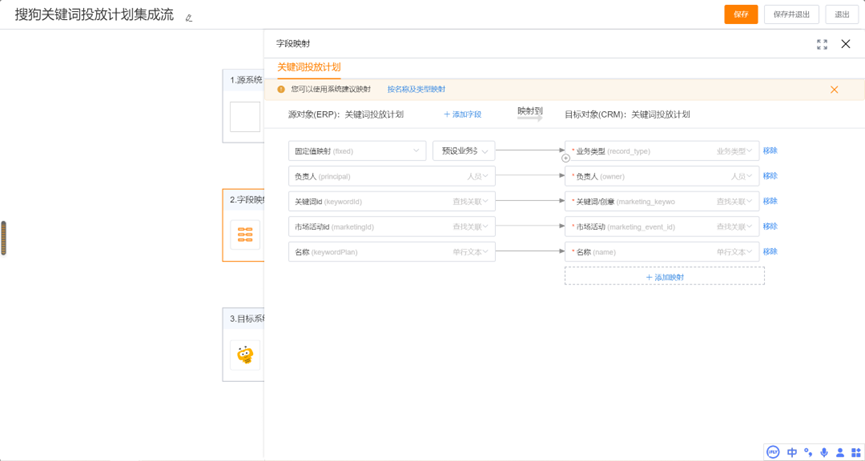
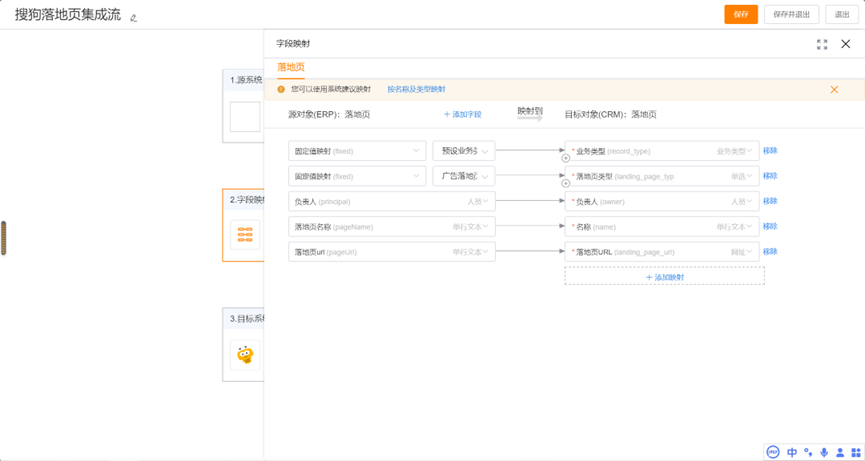
Click [Field Mapping] to configure the mapping of fields which are synchronized to CRM.
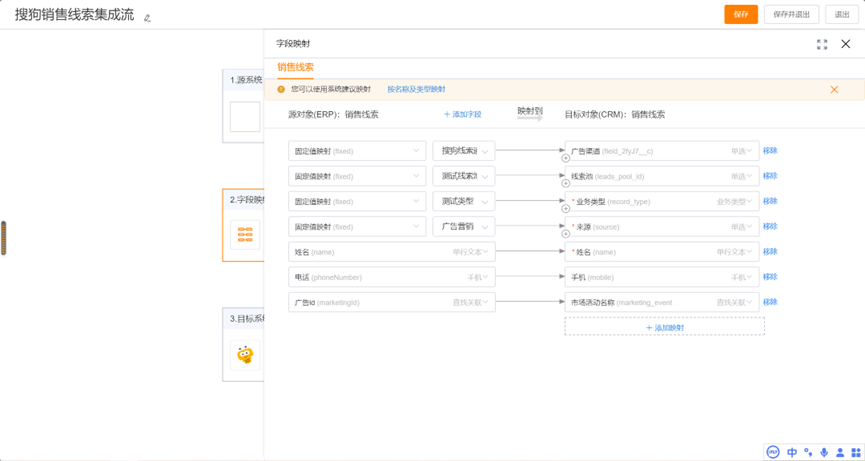
b. Add Sales Leads Integration Flow
c. Add Marketing Keyword Integration Flow
d. Add Keyword Placement Plan Integration Flow
e. Add Landing Page Integration Flow
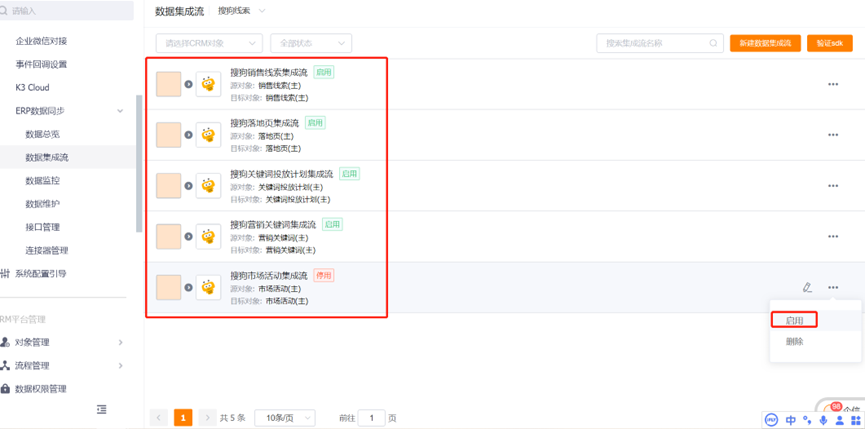
2) After the addition is complete, enable each integration flow to collect Sogou leads.
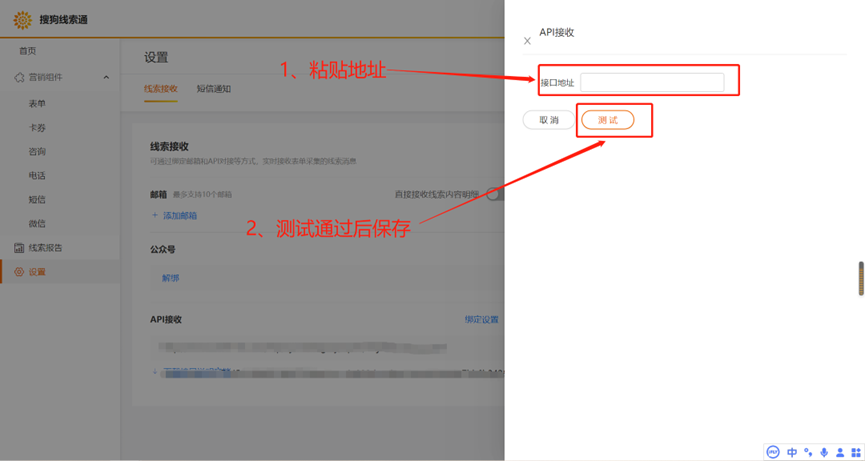
4. Bind Leads Receiving URL in Sogou E-Leads
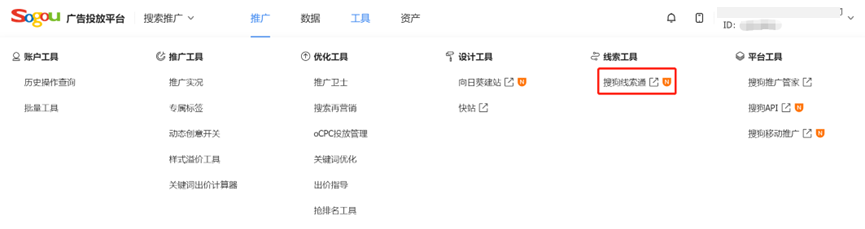
1) Log in to the Sogou promotion management platform, open the [Promotion] menu, and select [Sogou E-Leads].
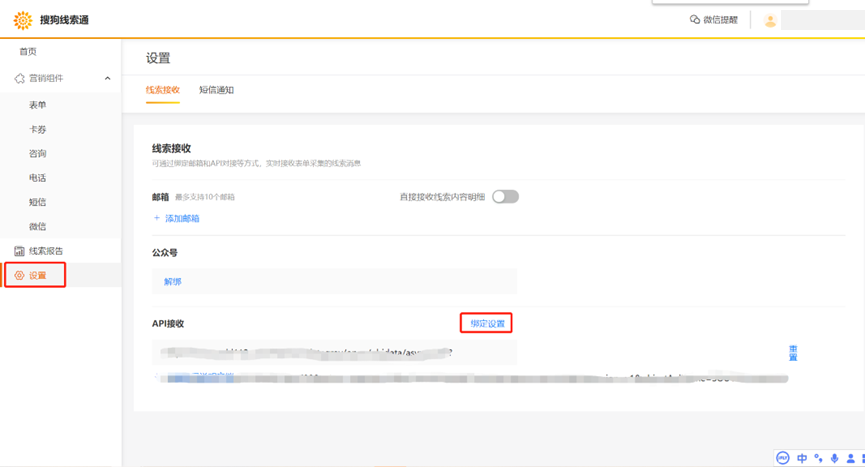
2) Enter the [Settings] page, click [Binding Settings] next to "API Receiving", paste the copied leads receiving URL in the "Interface Address", and then click Test, and save it after passing the verification.
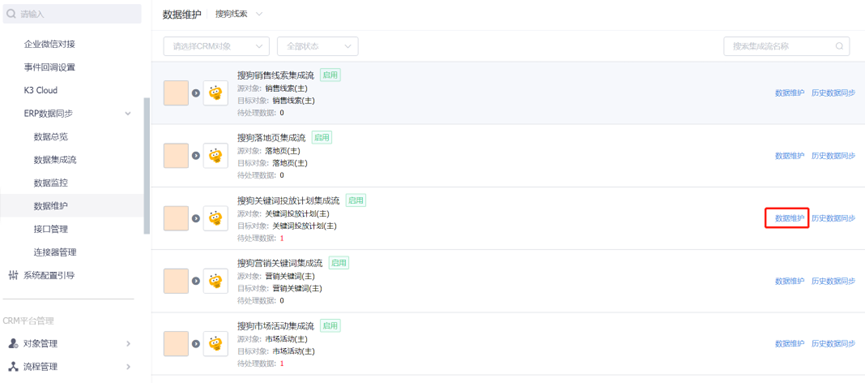
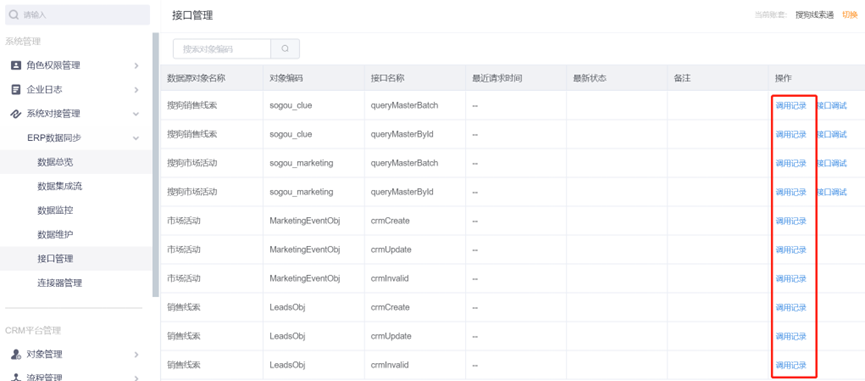
5. Data Synchronization Monitoring
1) You can click [Call Record] on the [Interface Management] page to view the synchronization of leads data to the connector.
2) You can click [Details] on the [Data Monitoring] page to view the synchronization of connector data to CRM.
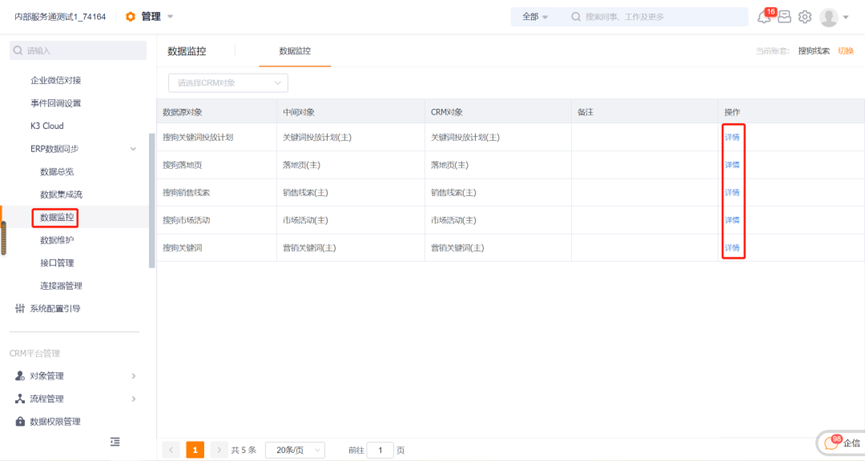
3) If the data synchronization fails, please go to the [Data Maintenance] page to re-synchronize.